Showing posts with label hot. Show all posts

Monday, January 13, 2014

Chocolate Warm Ups

Hello Sweets,

Since it's Monday I thought it would be fun to do a small, simple, but always delicious post :)  For those of you whom aren't familiar with my blog geographically, southern Ontario Canada has been getting pummeled by old man winter.  Thankfully for me I've been in Texas since Christmas so the weather here has been significantly milder, but I am not looking forward to my return home later this week :/  I have my winter jacket and boots with me so I am prepared clothing wise, but today was  70F (21C) so I am sure no matter what I wear I'll be freezing.

What is your favorite beverage on a cold winter day?  A hot cup of coffee or tea?  Maybe you add a little Baileys, lol or maybe you're completely PG like me and you enjoy a good old fashion cup of cocoa :D  I hadn't had a cup of cocoa in years, so in November when the DFW area got slammed by an ice storm cocoa went on the "must buy" shopping list.  Funny thing about the ice storm though, it caused deliveries to stores (ie; grocery stores) to become non existent lol.  I have never been in a grocery store where the eggs, milk, and many other things were completely sold out.  Of course the cocoa section of the grocery store was cleaned right out, well except for the instant add hot water thingies.  However, Nathan prefers the ones that require you to softly boil milk so they were not an option, actually I prefer them now too lol.  Feeling almost defeated we went to Starbucks to get some lattes, seeing they still had some of their cocoa left we decided that would do in a pinch.

Super Simple and Easy Cocoa
Ingredients
hot cocoa powder
milk
mini marshmallows or whipped cream
Ghirardelli makes everything chocolate even more amazing!!

Directions:
1)  Determine how many cups you'll need to make, if using large cups use 1 1/2 - 2 servings per person.  Measure out amount of milk needed, place into a saucepan and bring to a slow boil.

2)  Once boiling, add 1-2Tbs/cup of the cocoa powder and mix well.

3)  Pour into cups, top with mini marshmallows or whipped cream.  If you only have regular marshmallows, cut them into smaller pieces with a sharp knife (it will be uber sticky, so use patience). 
sticky, yet yummy work


perfect addition to a cold cuddle night
See, simple but delicious :)  Nothing beats a hot cup of cocoa on a chilly night, well nothing except cuddles!  Until next time....

Stay sweet,


Jennifer xoxoxo


Saturday, January 26, 2013

Canuckette's 5 Alarm Chili

Hello Sweets,

This had to be one of the worst weeks I've had in a while :(, my vertigo decided it would see how I liked going back to a childhood memory (spinning on teacups at Disney World, not fun!).  So of course I spent most of the week laying in the dark because my migraines we also especially painful, and then to top it off I felt so sick I couldn't even eat my comfort food O_O.  All in all it wasn't a good week to be in the kitchen creating, mostly because I couldn't even make it to the kitchen lol, but I still have a couple recipes hidden away, plus I think I am going to try something new in the next couple of days.  But for today I am going to pull one out of my stash, because the little I have done today has already proven to be too much :(

So the new recipe I'll be trying in a couple of days will compliment this dish perfectly, that should give y'all something to think about after reading today's post.  As you know my last post was about making my very own chili powder, which was inspired by this very dish that I came across on Hillbilly Housewife's website.  Clearly I am talking about chili lol, and I made my own personal tweaks to the recipe to make it more my own but my inspiration really came from Nathans dad, who made me chili a week or so before I left.  As you all know I am always homesick within days (if not the day) of coming home and to make matters worse I left a little dusting of snow for lots of snow and 18 degree (Fahrenheit), talk about a double downer.  The beauty of this recipe is that (besides the beans) everything is cooked in one pot, that equals less dishes and a happy girl lol.  I bet you're all wondering what makes me think I made a 5 alarm chili, well the original recipe only calls for a tablespoon of chili powder and mine has a whole heck of a lot more (to be accurate the entire amount I made lol oops).  So please heed caution and make it to the heat degree you're comfortable with, now let's get to the yummy goodness shall we?

Canuckette's 5 Alarm Chili (inspired by Hillbilly Housewife) 
Ingredients
1.5lbs ground beef (I use extra lean)
1 medium yellow onion, chopped
3 cloves fresh garlic, chopped
1 large can of tomatoes
1 (tiny) can of tomato paste
3 1/2C cooked beans, pinto or kidney (I used a combination of 3 and eyed the measurements, she also has great instructions to cook the beans if using fresh like me)
1Tbs chili powder (I use A LOT more, but I like spicy things)
 1/4Tsp black pepper, coarse
pinch of salt
1Tbs parsley (if desired)
 

Directions:
1)  In a large pot (at least 4qts), brown the ground beef and soften the chopped onions over medium.  Break the meat into smaller pieces as it cooks, once there is absolutely no pink left in the meat drain off the fat and return to burner.
 

2)  Add the canned tomatoes and tomato paste, add an additional 2-3 cups of water for simmering.
 

3)  Add the cooked beans, chili powder, salt, black pepper, and parsley.  Stir and bring to a boil.
 

4)  Reduce the heat to a simmer, and allow it to cook (covered or not) for about 1 hour and then enjoy!
 nom nom nom :)

I divided up the chili into multiple containers so I could freeze and pull out as needed (I'm only one little girl after all), but you can eat it straight away as a family meal or even bring it to a pot luck (I would turn the spiciness down considerably).  I have a couple of ways I love to eat chili, the traditional way with a little bit of cheese on top, with either cornbread or toast, and (this is going to sound weird) over top of french fries lol.  You can also enjoy it own its own, over rice, or with some crackers as well, but really the possibilities are endless.  Chili is the type of food to warm you from the inside and it's super healthy with all the fiber and protein.

I hope you all enjoy this recipe as much as I do (and still am), it is the perfect food for chilly Canadian winters (or any winter for that matter).   Now I am very confident that most of my readers (if not all) will know what I am making as the final recipe for the three part chili series, but on the off chance you don't, I'm keeping it as a surprise so you'll come back again tomorrow!  Until next time...................


Stay sweet,


Jennifer xoxoxo


Friday, January 25, 2013

Too Hot To Trot!

Hello Sweets,

I'mmmmmmm backkkkkk!!  Well at least for for a short little post, and I am sure you are wondering why for just a short post aren't ya?  Well I haven't slept yet, not a wink, and I am running on fumes lol and when that happens I tend to get a little crazy and loopy, well actually a lot!

Today I have another 2 day recipe extravaganza, well actually it will be a 3 day again but tonight's and tomorrows will combine to make one and the other will be an accompaniment!  As I am sure you are all aware every time I come back from Texas I get home sick right away, and I know my official "home" is here in Canada but my heart is content in Texas :)  Actually I am not just content , I am utterly and completely happy and nothing can ever change that.  So I thought what can I make that will make me feel like I am back in my loves house enjoying a great southern meal?  Well what are Texans known for?  Home cooking, beef, and spicy hotness, which equals....................chili!!

Now I wanted to make this as homemade as possible, which got me thinking; could I make my very own chili spice mix?  Well I'm sure it comes to no ones surprise that yes I can!  And I am pretty sure I would make Nathan proud because it isn't just spicy, it's hot just the way we like it :)  So since I am so exhausted, I decided that tonight's post will be about the simple yet spicy chili spice powder, created by yours truly ;)

Canuckette's Spicy Chili Powder
Ingredients
1 heaping Tsp paprika
2 heaping Tsp ground cumin
2Tsp cayenne (I like real spice, if you don't cut in half)
1 Tsp oregano
2 heaping Tsp garlic (again I love garlic so use at your own discretion)
1 - 1 1/2Tsp chili flakes (again for the spiciness I was going for)

Directions:
1)  Now they are sort of complicated so bare with me, combine all ingredients and seal in an air tight container.  Lol seriously that's all you have to do!
   

Super complicated right?  But the best things in life are just that, simple :)

Well that's about all the energy I have for this evening, but don't forget to come back tomorrow and check out the final product of my chili in all it's glory lol :)  Until next time.............................


Stay sweet,


 Jennifer xoxoxo

Wednesday, January 9, 2013

Spice Spice Baby

Hello Sweets,

I hope everyone is having a wonderful weekend. I have been laying pretty low since I have been feeling "off", but decided that I needed to try and take my mind off of that by getting back into the kitchen tonight!  We met up with our friend Dave tonight to exchange our Christmas gifts, and boy do people really know what I like!  Take a gander at my lovely gifts, can you tell I have a real passion now lol?

Thanks Dave!! Apparently this wine book will make me a bit of a wine snob lol

One other little gift Dave gave to me was my finalized logo cartoon!!  Check it out, then head over to his website.  He is in the middle of overhauling his blog so be prepared for the format to change in the coming months :)  It will soon be an art based blog, and trust me when I say he has the skills as you can see below.
Isn't she lovely :)

So as I had told you all in my last recipe post, while making the spicy green sauce for the enchilada's my kitchen creation wheels started turning with ideas for a new extra spicy salsa.  Being in Texas with Nathan and his family has shown me that if you say you're going to make something spicy you better be sure it delivers, so I didn't skimp on the heat but I am only posting this recipe as a guideline because not everyone likes it hot like we do lol!

Canuckette's Extra Spicy Salsa
Ingredients
(remember this is just a guideline, use your discretion)
20-30 tomatillos 
15-20 serrano peppers
5 habenaro peppers
1/2 white onion
1 lemon, zested and juiced
garlic, chopped
black pepper
garlic powder
sea salt
seasoning salt
 
 Directions:
1)  Remove the husks from the tomatillos and the stems from the peppers, and wash them.
 

2)  Place them all in a pot and boil until the tomatillos are lighter in color and soft.

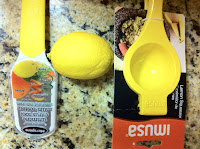
3)  While that is boiling zest and juice your lemon, then mix with the chopped onion.  Plus check out a couple more of my fun kitchen gadget gifts :)
 
  
super easy with all the fun tools :) (not shown is my kitchen aid chopper)

4)  Drain the water from the pot and then transfer everything into a blender, adding seasoning to your preferences.  Blend until desired consistency is reached and enjoy!
 

There you have it a super easy and affordable homemade salsa, plus you'll have a good amount perfect for a party or get together!

Well folks I only have a couple more days left with Nathan before I go home so you can bet I'll be baking something new and delicious :)  Plus he made some amazing and yummy shrimp for dinner so I'll be blogging about that tomorrow.  Until next time.............


Stay sweet,


Jennifer xoxoxo

Wednesday, January 2, 2013

Spicing Things Up In Your Life

Hello Sweets,

So now that everything is getting back to normal, it's time my blog got back to normal too!  I feel like it has been forever since I have given you guys a recipe, so today I'm giving you a great recipe :)

As you may or may not know, most of my family lives in the USA.  They're scattered all over the country in different states.  My auntie Peggy lives in California with my uncle Moise and cousins Gwenda, Genna, and Gilbert.  My uncle comes from Mexico, so when we went to visit them when I was younger they made all sorts of yummy Mexican food.  Now everything they made was delicious but there was one dish that my mom wanted the recipe to make at home and that was the enchiladas.  When my mom went to buy the items needed for the recipe, we ran into a bit of a snag since we lived in Canada, some of the produce had to be bought from a small bodega that we found in our city.  Once we had gathered everything we needed we spent the entire day making the dish, and trust me it is worth all the work it takes.  Now when I told Nathan and his dad that I planned on making enchiladas they didn't think it would be very spicy, but I warned them it would be and they'd be pleasantly surprised.  Now again I am going to give all of my lovely readers the same warning I gave them; it is very spicy.  If you don't like heat you should probably use a lot less Serrano peppers.  Let's get to the spicy treat shall we?

Auntie Peggy's Enchiladas
Ingredients
1 whole chicken
1 bottle of Mexican cream or heavy cream (not sour cream)
10-15 serrano peppers
20-30 tomatillos
corn tortillas (20 small or 10 large)
1 bag of  Monterrey cheese, shredded
seasoning salt
garlic, chopped
pepper
(Christmas blend Starbucks coffee not needed lol)

Directions:
1)  Wash the chicken and remove the gizzards (if you have a dog bake them in the oven for them!), season with seasoning salt, pepper, and salt.  Place in a large stock pot and fill with water, bring to a boil then simmer on medium-high for about 2 hours until the meat falls off the bone (or until the wing moves freely and there is not pink in the meat).  Set aside and allow to cool.
 

2)  While the chicken is cooking you can prepare the salsa; peel the tomatillos (husks) and wash them as they will be sticky and dirty.  Snap the stems off the Serrano and wash them, then place both into a large pot, fill with water, and boil.  Cook until the tomatillos become a light green.
 

3)  Place the tomatillos and serranos into a blender with the garlic, seasoning salt, and pepper.  Blend until the mixture is smooth, taste and add more seasoning if needed (it will be hot so be careful).

4)   Once the chicken is cooled de-bone and shred, place shredded chicken into a large bowl and add 1/4 of the salsa to it.  Toss the chicken so that the chicken is coated in the salsa.
 

5)  Now you will need to prep the tortillas.  Place a small amount of oil into a frying pan over medium heat.  Put a tortilla into the pan until lightly golden, flip and do the same to that side (15-25 seconds per side).
 

6)  Take the tortillas and spread salsa on them, once that is done add the cream to the salsa.
 

 7)  Grab a tortilla and put some chicken onto it, then roll closed and place them in a line in a baking dish.

8)  Once all rolled, spread cheese over top of the enchiladas.  Then pour the salsa (now with cream) over them.
 

9)  Bake at 350F until golden brown in spots.  Depending on your liking you can bake until parts become crispier.


Again, this dish is very hot spice wise, and I would tread with caution even if you enjoy hot food.  I know I don't provide measurements either but it is based solely on taste testing, so I encourage you to trust your taste buds.  Actually this recipe has spawned an idea for a new Canuckette original creation, salsa!!  I'm going to add some more ingredients and spices but the base is already there so I can only build on an already great thing :) 

 Now I am completely out of finished recipes, which means back to the kitchen drawing board for this girl.  I am baking tonight but some that I have already done (I've been craving more pecan shortbread), but I do have a couple ideas that I've been thinking about plus more fun kitchen gadgets so I am sure I'll have another good read for you :)  Until next time.........


Stay sweet,


Jennifer xoxoxo


Thursday, December 27, 2012

Jack Frost Nipping at Your Nose?

Hello Sweets,

Merry Christmas to all of my readers, from the great state of Texas!  I hope you all received some special kitchen tools from Santa, I know I did.  But more on that later, today was our first of two Christmas dinners and I would say it went off pretty much without a hitch.

Since I am writing this on Christmas eve (because even bloggers need a day off now and then) I thought I would keep it festive, so I saved one last holiday cookie recipe to share with all of you :)  I have some great memories from when I was a little girl and I am going to share one of those moments with you.  I come from Canada, and if you know your geography you know that no matter where you are in Canada, winter means snow, and a lot of it.  Well you knew where to find all the neighborhood kids when the snow started falling; outside enjoying the winter wonderland (although I no longer feel that way).  And when we finally were convinced to come inside every single part of us was frozen, sometimes even my mittens had icicles on them lol.  My grandmother would always make us hot cocoa with little tiny marshmallows in them, and it is a drink that I still enjoy today on a chilly night.  Well when I came across a recipe for hot cocoa cookies I couldn't pass them up!  Lets get to the warm gooey goodness that is this cookie :)

Hot Cocoa Cookies (via The Food Network Magazine)
Ingredients
2 1/4C cake flour, plus more for dusting
1/4C unsweetened Dutch-process cocoa powder
1 Tsp baking soda
1/4Tsp salt
1C butter, room temperature
3/4C sugar
1 large egg
1 Tsp vanilla extract
1/2C marshmallow cream
 

Directions:
1)  Sift the flour, cocoa powder, baking soda, and salt into a medium bowl.
 

2)  Beat the butter and sugar in a large bowl with a mixer on medium-high speed until light and fluffy, 3-5 minutes.
 

3)  Add the egg and vanilla and beat until incorporated.
 

 4)  Reduce the mixer speed to low; add the flour mixture in two batches and beat until just incorporated.
 

 5)  Divide the dough in half, wrap in plastic wrap and refrigerate until firm, at least 1 hour and up to 1 day.

6)  Line 2 baking sheets with parchment paper.  Working with one piece of dough at a time, dust the dough generously with flour and roll out between 2 pieces of parchment paper until about 1/8" thick.  Cut out shapes using 2 to 4 inch cookie cutters and transfer to the prepared baking sheets.  Gather the scraps and refrigerate until firm; re roll once to cut out more cookies.  Refrigerate the cutouts until firm, about 30 minutes.
 

 7)  Position the racks in the upper and lower thirds of the oven and preheat to 350F.  Bake the cookies, switching the position of the pans halfway through, until slightly puffed and darker around the edges, 12-15 minutes.  Let cool 5 minutes on the baking sheet, then transfer to racks to cool completely.  Sandwich the cookies with the marshmallow cream.
forgot to take a full picture, but don't these 2 look lovely :)

Well folks there it is, the final holiday cookie recipe I have for you.  Now that doesn't mean I won't be baking any goodies in the near future, have you heard me talk about my sweet toothed sweet heart??  Lol but who knows what Canuckette will bake next, heck I'm her and I don't know yet.  

I do want to warn you guys, I will have a couple of "technical" posts coming up. I just got a whole whack of fun kitchen toys from Nathans family and frankly I am SUPER excited to share with all of you :)  But I think my turkey tiredness is starting to kick in, so I will leave you with well wishes and a merry Christmas!  Until next time.......


Stay sweet,


Jennifer xoxoxo