Showing posts with label spices. Show all posts

Thursday, October 24, 2013

Another Little Addition to the Pumpkin Patch!

Hello Sweets,

Fall is in full swing in Ontario, which means bright and beautiful colored leaves.  I should probably take a picture so y'all can really understand my favorite part of colder weather.  The other thing I love about fall is all the fruits and veggies that become a staple on our dinner table, and we all know I have a not so secret love affair with pumpkin!

Do you know how many batches of pumpkin cupcakes I've made in the last two months?  I've made three batches, which is 72 cupcakes!  Crazy right?  Needless to say I felt the need to go outside of the box when I was left with extra pumpkin purée.  Last year I experimented with pumpkin pancakes, and they are the epitome of a fall breakfast food.  They are full of flavor, heavier than traditional pancakes so they're filling, and the spiciness is warm and reflection of fall.  However, that is not what I wanted to do, I wanted to bring y'all something new :)  I've been seeing a lot of pumpkin cookies popping up all over Facebook and Pinterest, but I hadn't seen one that really peaked my interest.  That is until last night, thank you insomnia lol finally a plus side!!

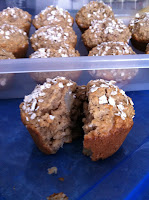
Spiced Pumpkin Oatmeal Cookies
Ingredients
Cookie:
2C flour
1 1/3C rolled oats (not quick!)
1 1/4tsp baking powder
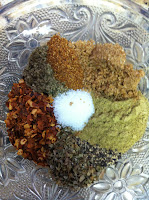
1 1/2tsp cinnamon
1tsp ginger
1tsp salt
1/2tsp nutmeg
1/2tsp allspice, heaping
1C butter, room temperature
1C packed dark brown sugar
1C sugar 
1 large egg, room temperature 
1tsp vanilla
1 3/4C pumpkin purée
 
Icing:
1 1/2C icing sugar
3Tbs + 1tsp milk
2Tbs maple syrup
 
Directions:
1)  Preheat oven to 350F, arrange oven racks so it's split into thirds.  Line baking sheets with parchment paper, set aside. 

2)  Whisk flour, oats, baking powder, cinnamon, ginger, salt, nutmeg, and allspice in a medium bowl to aerate and break up any lumps; set aside. 
 

3)  Place the butter and sugars in the bowl of a stand mixer, fit with a paddle attachment and beat on medium speed until light and fluffy, about five minutes. 
 

4)  Add the egg and vanilla, beating until fully incorporated about thirty seconds. 
 

5)  On low speed, add half of the flour mixture and mix well. Add 1/2 the pumpkin purée and mix until just incorporated.  Repeat with the remain in flour and pumpkin.
 

6)  Drop 8 dough rounds per baking sheet 2" apart on prepared sheets.  Put remaining dough in the refrigerator. 
 

7)  Bake for 12 minutes, rotate the pans from top to bottom and front to back until the cookies are golden brown on the bottom and sides, about 12 more minutes. 

8)  Cool on baking sheets for three minutes then transfer to a wire rack to cool.  Let baking sheets cool to room temperature before repeating with remaining cookie dough. Set cookies on parchment paper once cooled.

9)  Place all the glaze ingredients into a medium bowl and whisk until evenly combined.
 
 
10)  Dip fork in glaze and drizzle over cookies in a zigzag pattern. Let sit at room temperature for 20 minutes to allow the glaze to set before storing. 


These cookies are so delicious, full body flavor, spiciness, and soft chewy goodness.  I think from now on I'll make cupcakes and cookies, that should be a nice balance.  Might I dare even say these may be my new favorite cookie ;)  Ah who am I kidding, I'm a shortbread girl all the way lol!


Over the next few days I will be making some of my favorite cookies, so my posts will be shorter and random while recreating tried and true recipes.  I'll even be making a must have snack for Nathan ;)

I forgot to mention Nathan is coming to Canada this weekend!!!!!!!!!!  Can you tell I'm excited lol, I cannot wait to see him and be in his arms.  We have a jam packed couple of days, typical dinner/lunch with the grandparents.  Then on Sunday I am being baptized :) and I am very excited for all the important people in my life to be sharing that day with me, after we will all be heading out to one of my favorite restaurants, The Bungalow.  Ooooohhhh I am going to do a foodie review =)  Then we're hoping to spend some time with my mom and her husband before we jet off Monday back to my home in Texas!  I am a happy girl right now and nothing will take that away from me ;)  Until next time....


Stay sweet,


Jennifer xoxoxo


Wednesday, March 6, 2013

Lookin' Like A Certified Texan

Hello Sweets,

Well the week has begun. Have you been productive so far?  I've been sort of productive lol, I've had some bad migraines so I have been doing small projects and no writing :(  But I was feeling the itch to do a post so I'm giving it the old college try :)  I must say that I am very much enjoying being beside Nathan again.  Until you're in a long distant relationship you never appreciate the little things like holding hands or cuddling.  So if my posts are a little sporadic I apologize, but it probably means I'm enjoying my time with my soul mate ;)

So as I mentioned previously I tried something completely new in regards to my kitchen adventures.  I was actually intrigued because of an article I had read (again I don't remember where from lol).  Now I looked at tons of different recipes to determine what spices I wanted to include, but ended up using my favorite tool; my nose :) to really determine what needed to be added.  So are you sitting there wondering what I decided to try?  Well I said it is part of both the most important and delicious meal of the day, which means breakfast, and there are only specific things we can make.  I decided to tackle something that not everyone loves, but those who do have probably had a bunch of different ways, good ol' sausage!  That's right, Canuckette tackled breakfast sausage all on her own and succeeded!  Since I was creating these delicious patties I finally got to use another of my many kitchen gadgets that I was given at Christmas time.  Check out my Westin Patty Press, it made my sausage patties look very professional not to mention I can control the thickness of the patties.
 
pretty cool huh?

Now I'm going to share with you what I've created and will also give you other spices you can add depending on what flavor you are looking to create.

Texan Breakfast Sausage
Ingredients
2lbs ground pork
2Tsp marjoram
1 1/2Tbs sage
2Tsp red pepper flakes
2Tsp thyme
1/2tsp cayenne pepper
1/2Tsp salt
1/2Tsp black pepper
1/2Tsp cloves
1/2Tsp garlic powder
5Tbs maple syrup

Directions:
1)  Mix all ingredients in a bowl, put in the spices in small amounts so you can balance the flavors.  When you think you've reached your desired flavor, do at test patty so you know whether or not to adjusts the spices.
 

2)  Form into patties and fry for six minutes on each side, careful not to under cook for the obvious reasons or overcook as it will make them dry.  They can keep in the refrigerator for up to one week, or you can freeze them for later use :)
I paired them with my homemade biscuits and some home fries

Here are some of the other spices you can use in your breakfast sausage such as; nutmeg, rosemary, basil, fennel seed, ginger, cinnamon, allspice, mustard, cardamon, or caraway.

I encourage you to really use your sense when creating your sausage because even with just a sense of smell you can get a very good idea of what the flavor will be.  I hope you all have as much fun creating this sausage (although I could go without touching the ground pork) as I did, and that you get that flavor you're looking for.  Until next time...................................................


Stay sweet,


Jennifer xoxoxo

Saturday, February 2, 2013

A "Spicy" Pear

Hello Sweets,

I hope you all are having a fantastic Friday, after all it's the weekend!!  I'm going to see my grandparents this weekend, and I am going to make them an offer that I'm pretty sure they won't refuse.  I'm going to offer to make them dinner a few times a week. They choose the protein and I will take it from there :)  They are the best grandparents you could ask for, so I figure it's the least I can do, not to mention it allows me to expand my cooking skills because anyone who has to cook for someone knows it can be a pain.  Not to mention my grandmother is from an English background, so she doesn't like to experiment with spices, or even stray from cooking instructions for that matter lol, and my grandfather is from Malta (close to Italy) so he is the complete opposite.  I think it will be fun, for me, for them, and it will give my readers more variety, so everyone wins!!

I know that I said today's post would have some type of reminiscence to my childhood, but since I didn't get any sleep last night, I ended up flipping through a cookbook that was given to me at Christmas from our friend Dave (you know from Impact's Views).  It's funny, every time I can't sleep I end up eating better and getting some things done, but I think a lot is that because my body never goes into rest mode so I'm burning calories that I don't really have.  As I'm flipping through the cookbook I remembered that I had pears in the fridge that I wanted to use in a new way, and I had this weird random craving for oatmeal. Then, like a sign from the kitchen gods, I flipped to the perfect inspiration:  Spicy apple and oat muffins. They even had an option to make it with pears at the bottom.  Now of course I didn't follow their recipe, but I'm not going to take complete credit when they were my inspiration for them after all :)

Canuckette's Spicy Pear and Oat Muffin 
(inspired by 1001 cupcakes, cookies and other tempting treats)
Ingredients
6Tbs coconut oil, plus extra for greasing
1C all-purpose flour
1Tbs baking powder
heaping 1/2C dark brown sugar
2C rolled oats
 1 1/2 pears, cubed
2 eggs
1/2C light half and half
1/2C fresh apple juice
heaping 1/2Tsp allspice
heaping 1/2Tsp cinnamon
heaping 1/4Tsp ginger
(I ended up omitting the salt)

Directions:
1)  Preheat oven to 400F.  Grease 12 cup muffin tin.

2)  Sift together the flour, baking powder, allspice, cinnamon, and ginger into a large bowl.

3)  Stir in the sugar and 1 2/3C of the oats.

4)  Chop the unpeeled pears into bite size pieces (or smaller if preferred), discarding the core.  Add to the flour mixture and stir in.

5)  Place the eggs in a large bowl or container and beat lightly, then beat in the milk, apple juice, and oil.  

 6)  Make a well in the center of the dry mixture and pour in the egg mixture.  Stir gently until just combined; do not over mix.

7)  Spoon the batter into the muffin tin and sprinkle the tops with the remaining oats.  Bake for 18 minutes, or until well risen, golden brown and firm to touch, or when a toothpick inserted in the center comes out clean.

8)  Let cool in the pan for about 5 minutes, then serve warm or transfer to a wire rack to cool completely.

These muffins would be a great addition to your breakfast, or even as your mid morning snack. They aren't overly sweet and have a lovely spicy scent and flavor.  The pear recipe in the book called for pear juice but I decided to stick with the apple juice because the pears I got were sweet and I wanted to subdue that as much as possible.  This is definitely the type of recipe that can be tweaked with different spices, and you can most certainly use almost any fruit, it's the kind of muffin you can reinvent each season with the seasonal fruit.  I think I'll experiment with nuts and seeds as well, you can never have too much goodness can you?

Dave if you are reading this, thank you for the awesome gift, it is definitely getting used and has been a great source of inspiration and guidance.  Now I need to really delve into my wine course book soon, so that I can become a "wine snob" lol, not really, I just want to become more familiar with the different types of wine for when Nathan and I go out for dinner, or just to grab a bottle to enjoy by the fire :)  Life with Nathan is honestly perfect, and at the risk of sounding mushy and cheesy, I've never been happier in my life and feel very fortunate to have found my soul mate and my best friend all wrapped into one :)

So now I am going to enjoy a nice cup of tea with a muffin, do a little recipe research because I still have to dress up or "adultify" lol my childhood snacks.  Not to mention I have a bunch more fresh mint that I want to use as well.  Do any of my lovely readers have a suggestions for the mint?  I would love to hear from all of you, whether it is feedback on a recipe, a story, or even a suggestion. I'm never to busy to read comments and messages from you :)  Until next time...................


Stay sweet,


Jennifer xoxoxo
 

Friday, January 25, 2013

Too Hot To Trot!

Hello Sweets,

I'mmmmmmm backkkkkk!!  Well at least for for a short little post, and I am sure you are wondering why for just a short post aren't ya?  Well I haven't slept yet, not a wink, and I am running on fumes lol and when that happens I tend to get a little crazy and loopy, well actually a lot!

Today I have another 2 day recipe extravaganza, well actually it will be a 3 day again but tonight's and tomorrows will combine to make one and the other will be an accompaniment!  As I am sure you are all aware every time I come back from Texas I get home sick right away, and I know my official "home" is here in Canada but my heart is content in Texas :)  Actually I am not just content , I am utterly and completely happy and nothing can ever change that.  So I thought what can I make that will make me feel like I am back in my loves house enjoying a great southern meal?  Well what are Texans known for?  Home cooking, beef, and spicy hotness, which equals....................chili!!

Now I wanted to make this as homemade as possible, which got me thinking; could I make my very own chili spice mix?  Well I'm sure it comes to no ones surprise that yes I can!  And I am pretty sure I would make Nathan proud because it isn't just spicy, it's hot just the way we like it :)  So since I am so exhausted, I decided that tonight's post will be about the simple yet spicy chili spice powder, created by yours truly ;)

Canuckette's Spicy Chili Powder
Ingredients
1 heaping Tsp paprika
2 heaping Tsp ground cumin
2Tsp cayenne (I like real spice, if you don't cut in half)
1 Tsp oregano
2 heaping Tsp garlic (again I love garlic so use at your own discretion)
1 - 1 1/2Tsp chili flakes (again for the spiciness I was going for)

Directions:
1)  Now they are sort of complicated so bare with me, combine all ingredients and seal in an air tight container.  Lol seriously that's all you have to do!
   

Super complicated right?  But the best things in life are just that, simple :)

Well that's about all the energy I have for this evening, but don't forget to come back tomorrow and check out the final product of my chili in all it's glory lol :)  Until next time.............................


Stay sweet,


 Jennifer xoxoxo

Saturday, November 10, 2012

Soup's On!!

Hello Sweets,

I hope you are all having a wonderful weekend.  Mine so far has been fairly low key, which is a good thing, but I may get to see a couple of friends tonight for some post birthday laughs!  I talked with Nathan last night, and we've decided that I am still twenty-eight since we have yet to celebrate my birthday together (every girls dream lol), but I really liked the sound of that because he is the one person I do want to celebrate my birthday with!  Now don't get me wrong, I love all my family and friends, but he has a way about him that can make me forget, even if just for a moment, that I'm constantly in pain.  But enough about me, lets get to the meat of this blog, or in this case the chicken lol!!

I don't know about you guys, but the smell of freshly made soup wafting through the house is absolutely divine.  I don't remember clearly who had made soup from scratch in my house, but smelling the soup I am making right now, is giving me a nostalgic feeling that is reminiscence of my childhood.  Soup is really a great dish to make during the colder months, not just because it warms you up inside or is easy to make, but more importantly it stores and keeps fabulously!  You can literally throw in whatever your heart desires, because after all, it is your soup :)  I feel like soup is the "everything but the kitchen sink" kind of meal, because you can go through your crisper, cupboards, and leftovers to create a one of a kind creation, that is completely reflective of your pallet.  Now I made a dumb move, and instead of boiling down the bones into a broth, I threw them out (smh).  A girlfriend of mine (Heather), her boyfriend just got back from deer hunting, so overnight she had made the broth for her soup (yes I am a little jealous but now I know for next time).  So I just ended up using boxed broth.  I know not a great choice, but I did buy the lower sodium, and used all fresh ingredients for the rest (with the exception of my leftover chicken).  As of right now, it has been simmering for just over 35 minutes, and I have topped up the broth and added the noodles, within 30 minutes it will be all done and ready to eat!  Now lets get to this delicious recipe, so all of your homes can smell as savory as mine ;)

Canuckette's Chicken Soup
Ingredients
1/2 Box Whole wheat rotini noodles (or which ever you prefer)
1Qrt Chicken broth (or make your own)
1-2C Chicken, diced
1Tbs Extra virgin olive oil
3 stocks Celery, diced
3 Carrots, diced
2 potatoes, diced
1/2 Spanish onion, diced
Bay leaves
Garlic
Celery Salt
Sea Salt
Black Pepper
Whole Coriander, crushed
Oregano

Directions:
1)  In a large soup pot, heat the olive oil, meanwhile dice all the vegetables.  Place vegetables into pot and stir for 3-5 minutes, or until they start to soften.  Then add the garlic (about 1Tsp), allow to become aromatic (about 30 seconds), before mixing into the vegetables.
Before and After

2)  Dice the chicken, add to the vegetables, and top with the broth.  Add all your spices, I didn't give measurements because I don't use them I use my nose (if I had to guess; 4 bay leaves, 1Tsp garlic (after softening the veggies), 1/2Tsp celery salt, 1/2Tsp sea salt, 1Tsp pepper, 1/2Tsp coriander, and 1/2Tsp oregano).  Let simmer for at least thirty minutes, on low to medium heat.
Before and After simmer

3)  While that is simmering, boil your noodles.  I tend to leave them "al dente", because they will cook a little more on the final simmer.

4)  Add the noodles to the simmered vegetables and broth, at this point you'll be able to see if you need to top up the broth, or if you need to adjust the spices.  Let simmer on low for another fifteen minutes at least.
already looks and smells so good!

5)  Remove from heat, and serve, or divide up among containers to freeze and store.  But most importantly enjoy the fruits of your labor.
one for the fridge and one for the freezer :)

Now I like a heartier soup, so I opted out to adding anymore liquids to mine, but I did try some and it is a very nice, mild chicken noodle soup with plenty of vegetables with each bite!  I don't add a lot of salt because some people like it saltier than others, but you can always add this when you make your own bowl. Every time I make a new recipe I always make mental notes, what could I add more of, what can I include next time that I didn't this time.  And this soup is no different, although I think my next adventure will be trying my hand at the McWhorter stew that Nathan and his grandmother make :) I do after all, love family recipes that get passed down from generation to generation, like my grandmothers banana bread, or my grandfathers baked rice.  Perhaps tomorrow I'll do a biscuit or bread to accompany my soup, I guess you'll just have to come back and see ;)

Do you have a favorite soup you like to make?  Or maybe a favorite that someone in your family makes?  I always love hearing from everyone, with suggestions or even just fun facts.  Until next time..........

Stay sweet,


Jennifer xoxoxo