Monday, September 30, 2013

The Savory Potato


Hello Sweet,

Just a short little post tonight since I have a LOT on my mind, and no not fun stuff like baking :( *sigh*.  Today was a good day for the most part, I spent most of it with my grandparents and had some good news come out of it.  Nope I will not being sharing with y'all today, but when everything is set in motion I will share like no tomorrow.

As usual I made them dinner which makes me happy, especially because my grandmother eats a lot better when I do the cooking :)  I don't know why she does, but whatever get her proper nutrients is okay with me!  Since she picked out pre seasoned chicken I had to get more creative with the potatoes.  This is a little trick I learned while watching an info video of Gordon Ramsay, since he is one of my favorite chefs I love trying out his techniques.

Canuckette's Potatoes
Ingredients
8 small potatoes
salt
pepper
red pepper flakes
garlic powder
buffalo chicken seasoning
olive oil

Directions:
1)  Cut the potatoes into semi thick slices, and soft boil them until they are almost soft.  You want to leave them slightly under cooked as you will be finishing them in the frying pan.

2)  Drain the water and transfer to a frying pan with a small amount of olive oil in it.  Season them as you'd like, then start frying them over medium heat.
 

3)  As they are cooking toss them in the pan.  Continue doing this until they start to crisp on the outside.
 

These are very simple, yet tasty potatoes.  They're perfect for the people that don't care for mashed potatoes (they are out there), and they are more tasty then plain boiled ones.

See I told you this post would be short, and as awful as it makes me feel this migraine is making me feel worse :(  But I've got some ideas for some treats so for now I will continue exploring those ideas while I relax and try to will this feeling away.  Until next time....


Stay sweet,


Jennifer xoxoxoxo
 

Sunday, September 29, 2013

Fall Hauls!

Hello Sweets,

The weekend is over :( for y'all anyways lol!  You know me being off work and such makes everyday a weekend, which gets old real fast.  It seems like a lovely idea to lead the life of a cat ;) but in reality it gets boring quick, unless you're a cat then it's okay lol.  Today was a very productive day for me :)  I started my day off right by going to church, it was nice to see my pastor again although he asked where I had been :/ (I know bad girl)  It was okay though, they are well aware of my health issues and were just happy to see me again :)  Then Heather and I finally caught up!!  I told you I felt good about today lol, we completely lost track of time and were chatting for 2 1/2 hours.  We did a fun little trade, I gave her baked goods and she gave me board games win win!!

When I finally did make it home I realized, "hey what about the muffins I was going to make?".  So I looked at a couple different recipes and decided I was going to make my own.  I did that because I couldn't find something close enough to what I wanted, later this week I may make my spicy pear muffins because they are super yummy!  Now that it's getting chilly outside I am all about warm spices and fall hauls :)  Anyone who lives/lived in Ontario knows what September brings, an abundance of apples and pears!!  Two of my very favorite fruits, especially to bake with ;)

Spicy Apple and Pear Muffins
Ingredients
1/2C apple, diced
1/2C pear, diced
1/3C applesauce
3/4C milk (if you use skim it make the recipe fat free!)
1/2tsp salt
1 1/2tsp baking powder
1/3C sugar
1 3/4C all-purpose flour
1/4tsp ground ginger
1/2tsp cinnamon
1/2tsp allspice
(I pre-seasoned the fruit a little before with extra)
 

Directions:
1)  Preheat oven to 375F, greasing a muffin tin.  Mix together in a large bowl; sugar, cinnamon, ginger, and allspice.
 

2)  Add the flour, baking powder, salt, milk, and applesauce to the sugar mixture.  Do not over beat.
 

3)  Stir in the diced apples and pears.
 

4)  Spoon batter into the greased muffin cups.  Bake for 20 minutes, or until tops spring back when lightly pressed.
 

5)  Serve after muffins have cooled a bit, about 20 minutes.


(I did a double batch, that's why there's so many)

Right now my whole house smells like delicious fall baking, the smell is very close to apple pie :)  These muffins are smaller and dense, but you definitely only need one to curb your hunger.  I like the combination of the apples and pears together, they mesh really well and each bring there own dynamic to the muffin.  The apple is a little more tart so the pear gives it a little sweetness, I personally prefer fruit muffins because I like the moistness they give.

I know this post is a little short but my shoulder is all of a sudden screaming at me :(  Guess that's all I can give y'all tonight, but hey something is better than nothing right?  Until next time....


Stay sweet,


Jennifer xoxoxoxo


Saturday, September 28, 2013

Sweet Fluffy Clouds

Hello Sweets,


I hope y'all are having a lovely weekend :)  I started today off with a migraine, not a good thing lol, which obviously threw my whole day out of whack again.  Luckily the person I was supposed to meet up with is very understanding so we will try again tomorrow, but I've got a good feeling about it :)  We've been trying to connect for literally a week now lol, it's so hilarious to us.  So I've just been lounging around thinking and doing my crossword, and now I feel much better :)  I spent a few hours with my sister and nephew yesterday and I enjoyed it very much, but my shoulders are sore today so it was mostly resting and only a little creating today ;)

I've got a lot on my mind right now so focus is a little hard for me, but baking and creating in the kitchen always grabs my attention.  Since I have an upcoming party to get ready for I am in full planning mode, half the planning was done based on reputation (Pumpkin cupcakes sell themselves).  My main focus is on the birthday boy's cupcakes, he is going to be 8 and is a HUGE Star Wars fan so that is the theme!  Specifically he is a fan of Darth Vader and Darth Maul, yes he is a fan of the dark side lol.  So I am looking at  a couple different options for the decorations, and if I want to create a little character or symbol that is more crisp than just piping icing there are only a few different options.  I tried one of them today, it was my first time ever working with this type of product and making it myself.  I am proud and excited to announce that it was a success!

Marshmallow Fondant
Ingredients
marshmallows, small or big doesn't matter
icing sugar
water
food coloring, optional
flavoring oil, optional
  

Directions:
1)  Take a couple of handfuls of marshmallows and place them in a microwavable bowl.  Add a couple drops of water and toss until they're damp.  *if making more than one color use the whole bag*
 

2)  If using flavor oil, add in now and use less water.  Place the marshmallows in the microwave for 10 seconds at a time until they're puffed up and easily stir into goo with a wooden spoon.  *I sprayed my spoon with cooking spray to help the marshmallows from sticking*


3)  Add the food coloring to the melted marshmallows until you get the color you want.  Remember you're going to be adding icing sugar which will lighten the color, so make sure it's a bit brighter than needed. *I opted out for this batch as it was a test, and I may also need white ;)*

4)  Start folding icing sugar into the marshmallows until it becomes a soft and fluffy dough *I added heaping spoonfuls at a time*.  Dust hands and counter top with icing sugar, turn mixture out on the counter and sprinkle with icing sugar.
 

5)  Continue to kneed until stiff enough to roll out.  Dust rolling pin with icing sugar and roll the dough until you reach your desired thickness.  Cut is a sharp knife into desired shapes.


Sorry but I can't show you what shape I created today as it is a surprise, but any Star Wars fanatic will probably know based on the scored markings ;)  This is very sticky to work with until you reach the perfect consistency and then it is just like regular dough.  It's very tasty, like a sweet dense marshmallow and I look forward to seeing the kids at the party devour them :)

I'm thinking tomorrow about making something less on the dessert side, maybe muffins??  I bought some lovely apples and pears which has been filling my head with all sorts of ideas, I might even whip up a batch of my spicy pear muffins as they're oh so good!  Oh before I forget :p, yesterday I told you that I bought some new bakers treats and I would share them with y'all today, and I am true to my word;


isn't it pretty :)

I got it for half price (score!!), and it's compact and durable which will help with taking it to and from clients locations.  The shelves are also slightly tilted outward so displaying beautiful treats is even easier, eek I can't wait to use it!!  I know I'm a baking nerd who loves kitchen stuff, but I love getting new gear to make my passion even more of a breeze.  Until next time..........


Stay sweet,


Jennifer xoxoxoxo


Friday, September 27, 2013

The Nutty Monkey Gets Dressed Up

Hello Sweets,

So I know you've all been patiently waiting to have the final piece of the banana pecan cupcake puzzle, but I had to pick up some fun treats for myself.  I'm super excited to share my finds with y'all, however since it's so late I am just going to wait until tomorrow to unveil them.  I also wanted to show y'all my website but it's not quite ready yet, I will say that it's looking pretty dang good :)  I'm getting closer to it becoming live, which makes me very excited.

Today is the third and final post in the the "nutty monkey" series, and he is getting dressed up for a night on the town.  Lol okay not really but we need to get this sweet treat finished!  Since there are so many delicious flavors already involved in this I wanted to make sure they weren't overpowered with the icing.  The perfect icing that compliments any sweet treat is a cream cheese one, especially when it's a simple as vanilla.  This is a simple basic cream cheese icing, not complicated just good ;)

Cream Cheese Icing
Ingredients
8oz cream cheese, softened
1/2C butter, softened
2tsp vanilla
4C powdered sugar

Directions:
1)  Beat butter and cream cheese together in a medium bowl until smooth and creamy.
 

2)  Mix in icing sugar and vanilla until smooth.
 

To assemble the "nutty monkey";
Pipe the icing from the outside inward and top with the candied pecan, your guests will surely ask for more.
 

The perfect blend of sweetness in the cake and icing, topped with the salty sweet pecan.  These were a huge hit with both adults and children, you won't be able to keep them around long so make sure you set one aside for yourself ;)

I took these and the pumpkin spice cupcakes to my mother's party, part for a going away and part for a birthday.  Everyone complimented me on the flavors and quality, which is exactly why I am putting myself out there and taking a chance with my little business :)
 

I know my logo is not of the best quality right now, but I emailed my artist Dave and he sent me a higher resolution image that looks fantastic printed out.  Now to find a good place to order stickers or maybe even purchase sticker paper and do it myself, lol great more decisions.

Now I am going back to my website because it is soooo close to being done I can't take it, lol seriously Nathan keeps telling me that taking my time is okay but I just want it out there so bad!!  Until next time.....


 Stay sweet,


Jennifer xoxoxoxo


Thursday, September 26, 2013

That Nutty Monkey

Hello Sweets,

Sorry for the post being so late today, but I could not sleep last night which threw my whole day off :(  My roommate encouraged me to eat an apple to help with my stomach pains, did you know that apples help with stomach issues? I didn't.  Low and behold my stomach pains got less and less, and now I am feeling well enough to write a post!  I even had to cancel a get together with a fellow baking enthusiast which really broke my heart, thankfully she is very understanding to the saga that is my health.

Yesterday I wrote about the candied pecans that were adorned atop Dan's birthday cupcakes, today we are going to get straight to the cake!  When planning what type of cupcakes to make I asked my mother what are some of Dan's favorite flavors in a dessert.  He is very similar to my nephew because he loves banana type desserts, I had made a banana cupcake before but wanted a more moist cupcake than previously produced.  I found a recipe that had a good amount of bananas in the ingredients so I knew it wouldn't be dry at all, and of course it also included another delightful ingredient, pecans!  Tomorrow's post will include the icing so you can recreate this delicious treat yourself, but for now we'll focus on the foundation of any cupcake ;)

Pecan Banana Cupcakes
Ingredients
1/2C butter, softened
8oz cream cheese, softened
1C brown sugar
1C sugar
2 eggs
1/2C oil
1/3C applesauce
2C flour
2tsp baking soda
2tsp baking powder
1Tbs cinnamon
1/2tsp salt
3C bananas, mashed (approx. 6)
1tsp vanilla
1C pecans, chopped
 

Directions:
1)  Preheat oven to 350F.  Line muffin tins and set aside.  In a large bow, beat butter and cream cheese together until smooth and creamy.
 

2)  Slowly beat in sugars until light and fluffy.
 

3)  Add eggs one at a time until fully incorporated.
 

4)  Stir in oil and applesauce; mix well.
 

5)  Mix in flour, baking soda, baking powder, cinnamon, and salt until just combined.  Stir in bananas and vanilla.
 

6)  Fold in pecans.  Fill cups 2/3 full, baking for 28-33 minutes or until toothpick comes out clean.
 

7)  Allot to cool in pan for 10 minutes then transfer to wire rack.  Allow to completely cool before icing.

These cupcakes are very moist and full of flavor, there wasn't a single bad thing said about these bad boys.  They may look like muffins, but they are sweet like a cake.  I personally like unusual cupcakes, so naturally these are a permanent fixture in my recipe book.  Here's a sneak peak of what was taken to the party;
 

Hahaha, you though I was going to show you a snippet of the finished cupcakes didn't you?  Y'all should know better than that!   Trust me when I say these are worth the wait, and it's less than 24 hours before you can create a frosting that is perfect for this cupcake :)

I know yesterday I said I was hoping to have my website up and running today, but I'm a perfectionist so it's still in the works lol.  It's close to being done, I just want everything to look well and for it to be easy to navigate.  Maybe by tomorrow night I will be able to share it with everyone, but I promise it will be worth the wait :)  Until next time......


Stay sweet,


Jennifer xoxoxo

Wednesday, September 25, 2013

The Nutty Candy Man

Hello Sweets,

How are all my lovely readers today?  I am in a fantastic mood :), which is weird because I woke up with a migraine and that normally makes me grumpy all day.  I was lucky enough to spend a few hours with my nephew Miguel, and he is just the best little boy around.  I know I'm biased, but he's just so funny and inquisitive right now.  Today I showed him a video of Nathan and I flying around the Dallas area, he was in complete awe.  He couldn't believe what he was seeing, and at one point he thought we were in a helicopter because he saw the propeller.  Once I explained to him what the propeller was for he had this adorable little smile on his face :D  I asked him if he would want to go flying in the airplane when he comes visit Texas, and he excitedly said YES!  I know this will make Nathan very happy, as he wants to get to know him better (seeing as he'll be his uncle one day) but that's hard when we live in two different countries.  In the meantime Nathan is going to bring back an American Airlines plane on his next visit for him to start building their relationship, these two are the cutest!

So today's post is a short one, mostly because the recipe is short but also because the website is almost ready to go live and I'm hoping to finish that up tonight so I can share it with y'all tomorrow.  Okay maybe there is one more tiny reason, Criminal Minds starts back up tonight and my roomie and I watch it together lol (I know, silly).  Today's post is the first in a three part series, these recipes were part of my "first delivery" which was for a party my mom was threw.  It was actually her husbands birthday, so I decided to make a cupcake geared towards his favorite things.  This sweet little treat was the finishing touch, and lets just say "someone" may have eaten one without eating the cupcake just so they could have one lol ;)

Canuckette's Candied Pecans
Ingredients
1/3C sugar
1/3C brown sugar
1tsp cinnamon, heaping
1 egg white
1Tbs water
1 2/3C pecans
splash of vanilla
tiny pinch of salt
 
(vanilla not show as it was a last minute addition)

Directions:
1)  Preheat oven to 250F.  Mix sugars, cinnamon, and salt together in a small bowl, set aside.
 

2)  Whisk egg white, vanilla, and water together in a separate bowl until frothy.  Toss pecans in egg wash.
 

3)  Mix pecans in the sugar mix until they are evenly coated.  Spread onto a baking sheet.  Bake for 1 hour, stirring every 15 minutes until pecans are evenly brown.
 

4)  Allow to cool on parchment paper and enjoy!


Don't they look yummy :)

They are the perfect blend of salty and sweet, not to mention it's the best nut around!  Obviously I ended up with leftovers, but I'm sure I can figure out something to do with them ;) lol.  These are so much better than the pre made ones you can get at a local baking supply store, but the pan needs to be cleaned right away as it is a sticky mess.  Also, I wouldn't use a good baking sheet because you will need to scrub it clean.  

So like I said earlier, I am hoping to roll out the website either tonight or tomorrow.  As soon as I do I'll share it with y'all, and just like my blog I always love hearing feedback :)  But right now I'm going to go make some more of my now famous Pumpkin Spice Cupcakes, because I don't want the pumpkin puree I already have open to spoil.  And maybe because I didn't keep many for myself from the last batch lol, and damn they're good.  Until next time............


Stay sweet,


Jennifer xoxoxo

Tuesday, September 24, 2013

A Little Chicken

Hello Sweets,

Well it's official, Canuckette's Creations has booked it's first order!  I would be lying if I said that I wasn't nervous lol, but it's a big step which mean I can only go up :)  For the last 36 hours I have been creating a website (still in progress), and working on a price list so I can price jobs appropriately.  I know this all seems daunting right now, but it once I get this stuff done I'll be sitting pretty ;)

Today I thought I would do a post regarding how I'm seeing myself, like a scared little chicken lol!  I love roasted chicken, and I will be the first to admit that I've bought the pre made kind at the deli counter *slinks away*.  Last week I was craving chicken, a lot, and as I walked by the deli counter I thought to myself "I can do that myself, and better!".  It is more expensive to buy a whole chicken and make it myself compared to the pre made, but you don't know what goes into it (sodium mainly) and you'll never know how to make one on your own.  So I bought a whole chicken, did a little research and
gave it the good ol' college try.  I went into this feeling pretty confident, and kept a positive attitude.  I set out to make a flavorful and moist chicken, something that is harder to achieve than you'd think.  Thankfully I have nothing but positive news to report, and if you follow these simple steps your kitchen will smell just as divine as mine did!

Canuckette's Roasted Chicken
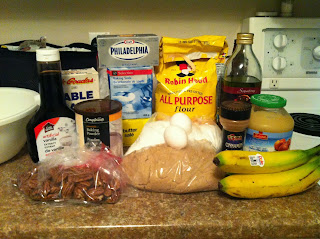
Ingredients
1 whole chicken
carrots, chopped (not pictured)
potatoes, chopped (not pictured)
2tbs butter
garlic
red pepper flakes
chili powder
coriander
rosemary
olive oil
salt
pepper
 

Directions:
1)  Preheat oven to 425F.  Wash chicken, then dry it very well with paper towels both inside and out.
 

2)  Salt and pepper the cavity of the chicken, then truss (tie the legs/wings together) the chicken.  This is to prevent your chicken from drying out, however I did not do this and mine turned out fine :)  Season the chicken with salt and pepper, then rub all over with the butter.
 

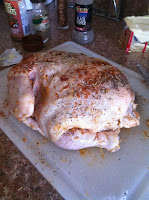
3)  Then season the chicken as you would like.  Place the seasoned chicken in a roasting pan and surround with the carrots and potatoes.  I drizzled a very small amount of olive oil onto the veggies but not too much as the chicken fat will do most of the work.
 

4)  Place the chicken in the preheated oven and bake for 60mins.  Check after one hour, if the legs and wings move easily it is complete.  If it's not done check every ten minutes so you don't over cook and dry it out.
 

5)  Remove the chicken from the oven and set on a cutting board (with grooved edges so the juices don't spill), allowing to sit for 10 minutes before cutting.
 

I don't think I'll ever buy a pre made chicken again, this was so moist and juicy and it still was when I had leftovers.  I made my chicken a little spicy because that is my preference, but you can use any spices that you like and make it your own :)  Since I seasoned the chicken so well I didn't need to season the veggies, they absorb the flavors of the chicken and taste AMAZING!

Well this post was a lovely little break for me, I was getting ridiculously stressed about the website and needed a much needed break.  Now that I feel recharged I'm going dive right back into my new little world.  If you're on Facebook feel free to stop by my business page to say hello, follow, or peruse the pictures and maybe even place an order ;)  I also just wanted to take a moment to say a big "THANK YOU" to all of y'all.  Without my faithful readers I don't know if I would have put myself out there, or ever!  Until next time......


Stay sweet,


Jennifer xoxoxo