Showing posts with label cream cheese. Show all posts

Friday, September 27, 2013

The Nutty Monkey Gets Dressed Up

Hello Sweets,

So I know you've all been patiently waiting to have the final piece of the banana pecan cupcake puzzle, but I had to pick up some fun treats for myself.  I'm super excited to share my finds with y'all, however since it's so late I am just going to wait until tomorrow to unveil them.  I also wanted to show y'all my website but it's not quite ready yet, I will say that it's looking pretty dang good :)  I'm getting closer to it becoming live, which makes me very excited.

Today is the third and final post in the the "nutty monkey" series, and he is getting dressed up for a night on the town.  Lol okay not really but we need to get this sweet treat finished!  Since there are so many delicious flavors already involved in this I wanted to make sure they weren't overpowered with the icing.  The perfect icing that compliments any sweet treat is a cream cheese one, especially when it's a simple as vanilla.  This is a simple basic cream cheese icing, not complicated just good ;)

Cream Cheese Icing
Ingredients
8oz cream cheese, softened
1/2C butter, softened
2tsp vanilla
4C powdered sugar

Directions:
1)  Beat butter and cream cheese together in a medium bowl until smooth and creamy.
 

2)  Mix in icing sugar and vanilla until smooth.
 

To assemble the "nutty monkey";
Pipe the icing from the outside inward and top with the candied pecan, your guests will surely ask for more.
 

The perfect blend of sweetness in the cake and icing, topped with the salty sweet pecan.  These were a huge hit with both adults and children, you won't be able to keep them around long so make sure you set one aside for yourself ;)

I took these and the pumpkin spice cupcakes to my mother's party, part for a going away and part for a birthday.  Everyone complimented me on the flavors and quality, which is exactly why I am putting myself out there and taking a chance with my little business :)
 

I know my logo is not of the best quality right now, but I emailed my artist Dave and he sent me a higher resolution image that looks fantastic printed out.  Now to find a good place to order stickers or maybe even purchase sticker paper and do it myself, lol great more decisions.

Now I am going back to my website because it is soooo close to being done I can't take it, lol seriously Nathan keeps telling me that taking my time is okay but I just want it out there so bad!!  Until next time.....


 Stay sweet,


Jennifer xoxoxoxo


Wednesday, February 27, 2013

Eh, What's Up Doc?

Hello Sweets,

You've made it to the middle of the week :) and now I'm sure most of you are counting down the days until the weekend right?  I'm honestly excited for tomorrow, and I am sure you are thinking to yourself what's so special about Thursday?  Well firstly it's the night a new episode of The Big Bang Theory is shown, secondly when I'm in Texas on a Thursday it's steak night (YUM!!) and when it's Nathan behind the grill it's guaranteed deliciousness, and thirdly I'm getting a hair cut!!  I know normally a hair cut is nothing big, but it's been well over a year since I've had a haircut and I am so over due that I am trusting the good reviewers on Yelp to help me find a fantastic salon here in Texas, and most girls will tell you trying a hairdresser you know nothing about can be kind of scary, so send positive vibes for me tomorrow :)

Any who, you guys don't come here for tales of new hair adventures, but you do come for good eats and that is exactly what I have for you today, I'm actually spoiling you with two recipes instead of just one (I love you guys that much!).  I'm not sure if you remember but a few weeks ago I was talking about doing some posts about revamped food from our childhood, only problem was I never got around to it :(   But today I am bringing you a recipe that I used to have all the time as a child, but with a sweet little twist to it.  I even brought it to a luncheon I had that same week and needless to say there wasn't anything to bring home, but the best part was no one could put their finger on what the mystery ingredient and when I told them they were pleasantly surprised.  Now enough talk, lets get you in the kitchen and creating with another great recipe inspired by the wonderful app AllRecipes (seriously if you haven't gotten it yet you really should).

Carrot Pineapple Cake
Ingredients
 2C all-purpose flour
2Tsp baking soda
1 Tsp baking powder
1 Tsp salt
2Tsp cinnamon
1 3/4C sugar
1C extra virgin olive oil
3 eggs
1 Tsp vanilla extract
2C carrots, shredded
1C coconut, shredded
1C pecans, chopped
1C pineapple, crushed and drained

Directions:
1)  Preheat oven to  350F.  Grease a 9"x13" baking pan and set aside.  Mix flour, baking soda, baking powder, salt, and cinnamon.
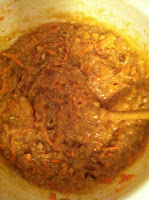
 2)  Make a well in the center and add sugar, oil, eggs, and vanilla.  Mix with wooden spoon until smooth.
the well was over"whelmed" lol

3)  Stir in carrots, coconut, pecans, and pineapple.

4)   Pour into baking pan and bake for about 45 minutes, or until a toothpick inserted into the center comes out clean.  Don't panic as the center will sink slightly.  Allow to cool before icing.

Cinnamon Coconut Cream Cheese Icing
Ingredients
8oz cream cheese
1/4C butter, softened
2C powdered sugar
1 Tsp cinnamon
dash of allspice
1/2C pecans, chopped
cinnamon and allspice not pictured :/

Directions:
1)  Cream the butter and cream cheese together until smooth.  Add the spices and icing sugar and beat until creamy.

2)  Ice the cake and top with the chopped pecans.
Forgot to take a pic and only this tiny piece remained

This is very moist and has a wonderful sweetness that is created by the pineapple.  I like carrot cake, but I don't think regular carrot cake will cut it anymore, lol.  This is definitely a keeper and will be made again.  If you decided to make it you can change (or even omit) the nuts, and play with the spices a little I didn't follow the measurements to a t, but that is just how I bake :)

So there you have it, the final recipe that was waiting to be published, and it's good timing too, because when I'm here in Texas I do nothing but spoil my sweetheart with sweet and delectable treats ;)  Tomorrow I think I will blog about our dinner, he is making the steak and I am in charge of the veggies so it is a joint meal, and maybe I can even get him to write a little about his marinating techniques if we're lucky!  And be on the lookout for a delicious chocolate peanut butter duet that is sure to be a hit, I say that because as soon as I saw the idea I had to make it a reality.  Until next time............


Stay sweet,


Jennifer xoxoxo

Friday, November 9, 2012

A Happy Birthday Cheesecake :)

Hello Sweets,

I hope you all had a fantastic Friday,  It's my birthday today, although it doesn't really feel like it. Actually, this is the first year where I could have probably gone almost all day without hearing much of anything, with the exception of Facebook.  It hasn't really bothered me too much, but I'm not going to lie, there have been a couple of tears, but not because of me turning twenty-nine.  I'm really rather excited, like I always say; "women are like a fine wine, they only get better with age" ;) and I whole heartily believe this, but I think it's because I realize how much my health had really impacted my life.  Every year you grow a little more and learn new things, I always like to look back to when I was younger, and take an enormous amount of pride in how much I have changed for the better!

So what did I do for my birthday you ask?  Well I got all my weekend cleaning out of the way (this screams adult lol), and had a nice quite lunch at home by myself, and then I made myself a delicious cheesecake from an old family recipe, with a couple of "jennifications" of course.  Now as I start writing this post, the cheesecake is cooling in the refrigerator (hardest part of any dessert is the waiting), and by the time I post this, you will see a picture of me enjoying the fruits of my labor as my birthday treat.  I also believe that you truly cannot celebrate your birthday without having either your favorite meal or dessert, so as of right now I have yet to celebrate my birthday, but I will by 10pm.  Okay on to the good stuff, that which we will call the "Happy Birthday Cheesecake", and only because I made it for my birthday lol there is no birthday cake flavors to it :p

Canuckette's Cheesecake 
Ingredients
Crust:
1 1/2C graham cracker crumbs (I used whole then used a food processor)
1/2C Pecans, finely chopped
1/2C Walnuts, finely chopped
1/2Tsp Cinnamon
1/2Tsp Nutmeg
1/3C butter, melted
Filling:
4-8 ounce pkgs of Cream Cheese
1 1/4C Granulated sugar
1/2C Sour Cream
2Tsp Vanilla extract
5 Eggs
Topping:
1/2C Sour Cream
2Tsp Granulated sugar
Optional Garnish: Whip Cream (I opted for my signature Cherry topping)

Directions:
1)  Preheat oven to 475F, place a large pan or oven-safe skillet (that the cheesecake pan will fit inside), filled with about 1/2 inch of water, into the oven while it preheats.  This will be your water bath.
my cheesecakes bath

2)  Combine all the dry ingredients for the crust into a medium bowl, mix in the melted butter.  Press the crumb into a 9" spring form pan that has been lined on the bottom and sides with parchment paper (I don't have a spring form pan, but you can use a regular cake pan or pie tin if you're going to serve directly from it).  Use the bottom of a glass to press the crumb mix flat into the bottom of the pan and about 2/3 up the side.  Wrap a large piece of foil around the bottom of the pan to keep the cheesecake dry when in the water bath in the oven.  Put the crust in your freezer until your filling is complete.


The smell of the graham/nut crust is divine

3)  Using an electric mixer, combine the cream cheese, sugar, sour cream, and vanilla; blending until the ingredients are smooth and creamy.  Be sure, as always, to scrape down the sides of the bowl.  Whisk the eggs in a medium bowl, and then add them to the cream cheese mixture.  Blend the mixture just long enough to integrate the eggs, over mixing will cause the cheesecake to crack


All the creamy goodness :)

4)  Remove the crust from the freezer and pour the filling into it.  Carefully place the cheesecake into the preheated water bath.  Bake for 12 minutes at 475F, then turn down the oven to 350F, and bake for 50-60 minutes (it will be down once the top of the cheesecake turns a light brown color).  Remove the cheesecake from the oven to cool.
Mmmm mmm YUM!!

5)  When the cheesecake has cooled, combine the sour cream and sugar for the topping.  Spread the sweetened sour cream over the entire top surface of the cheesecake.  Cover and chill the cheesecake in the refrigerator for at least 4 hours.  Makes about 12 servings.
Now the final wait begins

Once of the hardest parts about making cheesecake is waiting for it to be completely cooled before eating, if you don't let it cool completely it won't set in the middle and will be runny and no one likes a runny cheesecake lol!

So thus ends my birthday baking, :) of course it tastes delicious, I did make it after all lol.  But seriously I think one of the best things you can learn when baking is to bake with confidence, and even when things don't turn up roses, knowing that you gave it your best is really the only thing that matters.  Also trying to determine the point of your mistake, and learning from it, there is never a wrong turn in a recipe only lessons to be learned. 
first piece didn't cut so pretty but it tastes pretty good :)

Now I'm going to enjoy the rest of my piece of birthday cheesecake, I really think they should replace birthday cake with cheesecake, after all it is much more enjoyable :)   Until next time......
mmmm happy birthday to me!!

Stay sweet,


Jennifer xoxoxo