Showing posts with label fun. Show all posts

Friday, February 28, 2014

The Granola Goddess

Hello Sweets,

I guess all the productiveness from yesterday made for a sore body today :(  Not to mention the migraine I had was a little ridiculous, lol my poor landlord had to stop by and felt horrible.  I told her it was okay that she stopped by as I knew it was going to be quick, and that I was also going back to bed :p  Thankfully I had leftovers from yesterday, so at least I didn't have to strain to make sure I ate.  Although I haven't eaten any of it yet, but I managed to get a banana and some crackers down so far...yayyy!  I'm going to try eating some soup here soon, so let's think positively lol.

Thankfully I did make something last night after I finished my post :D  Unfortunately I forget that I didn't pick up any eggs yet, so I couldn't make any muffins.  So obviously that made figuring out another recipe a bit of a challenge, until I made a snack that is.  Probably one of my favorite snacks right now is yogurt and granola, it makes me happy lol.  So that got me thinking, why haven't I made my own granola yet?  Clearly I had no good reason, so that made my decision to make some that much easier.  I looked at some recipes to determine whether or not I had everything I needed, and although I didn't have some things I had some other interesting substitutions :)

Canuckette's Granola
Ingredients
6C rolled oats
1/4C dark brown sugar
1/2C olive oil
1/3C honey
2tsp vanilla
1/4C coconut flakes
1/2C raisins
1/2C dried cherries
1C pecans, chopped
 

Directions:
1)  Preheat oven to 350F.  Mix rolled oats and brown sugar together. 
                          

2)  In a separate bowl; whisk together the oil, honey, and vanilla. 


3)  Pour over dry mixture, stirring well to coat thoroughly.
 

4)  Add in chopped nuts (and seeds if you want) at this point.


5)  Spread on a sprayed baking sheet and bake for 30 minutes.  Stir frequently (every 5 mins) to ensure even baking.  It should be golden brown when done.
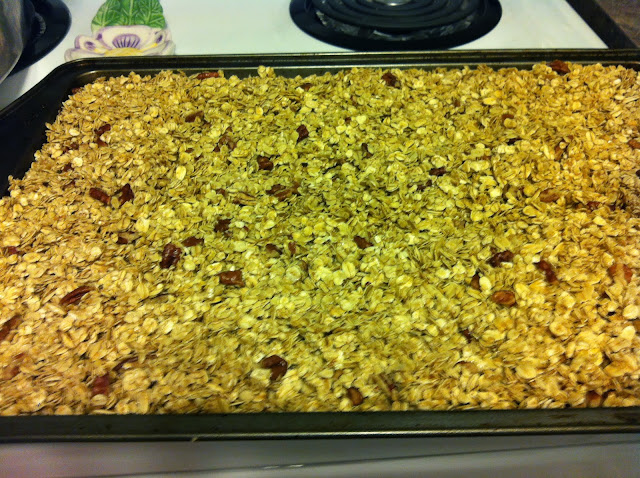
 

6)  Add dried fruit and coconut once it's done cooking.


7)  Let cool on baking sheet, then break up any large pieces.  Store in an airtight container.  Stores for 3 weeks.
Not only did my house smell amazing, but it tastes great too!

Not only do you know exactly what goes into it, but it tastes a million times better because it's fresh.  You can also personalize it for everyone in your family :)  Don't like coconut, leave it out!  Big fan of flax seed, add it in!  You could even add in chocolate chips to it if you're a chocoholic.  What ever you do make it your own, that way you'll enjoy eating it.

First thing I'm doing tomorrow is getting some eggs, lol let's face it I'm going to need them.  As long as I do that the sky's the limit tomorrow!  Now to make that limitless list, a little shorter ;)  For the rest of tonight I'll be relaxing and talking to the love of my life, and if my migraine will permit it maybe a little painting too!  Until next time....


Stay sweet,


Jennifer xoxoxo

Saturday, January 18, 2014

For the Little Kid In Me!

Hello Sweets,

I hope everyone is enjoying their Friday, for all the working people you've earned it!  I am off back to Canadia tomorrow, normally I am completely distraught having to leave Nathan.  Not this time though, well maybe still a bit lol who am I kidding, only because I am getting ready to move :)  I still have a little packing to do (bedroom only), and I am doing my final walk through now that the apartment is completely finished.  I am one excited and happy girl, I've never lived in a brand new apartment so I am pumped!!

Since it's Friday and my last night with Nathan I figured a short post will be okay, don't worry there is still a sweet treat in store for y'all.  Today's delicious treat is brought to you on behalf of Kellogg's, and their delicious cereal Rice Crispies.  I bet y'all can figure out what we're making, but first let's go down memory lane for some history on my Rice Crispy story.  When I was small and even elementary school age, I ate almost all of my breakfasts with my grandparents.  Normally I would eat eggs and bacon, but some times I would eat a bowl of rice crispies.  However, when my grandmother had her back turned I would put a whole lot of sugar on top.  I mean a LOT, lol so when I'd scrape the bottom of the bowl I would get a spoonful of sugar :)  Of course my grandma would make rice crispy treats every once in a while, and I hadn't had them in years.  That is until a few months ago when Nathan asked me to make him some, and I am making them monthly now lol.  This is obviously not my recipe but I add a little more of some things.

Rice Crispy Treats
Ingredients
6C Rice Crispy Cereal
4Tbs Butter
42 Marshmallows
Love simple recipes

Directions:
1)  Melt the butter in a large pot over low heat.
 

2)  Once the butter is melted, add the marshmallows until completely melted.

3)  Remove from heat and add the rice crispies, mixing until blended.

4)  Grease a baking dish and pour the mixture in, pressing evenly flat with wax paper.

5)  Allow to cool completely before cutting.  Store in an air tight container.
yummy!!
See, wasn't that simple, easy, and delicious?  You can't beat cereal treats, they are your guide down memory lane to childhood.  The are many ways you can dress these bad boys up, from adding chocolate (chips or on top), nuts, food coloring, or even cutting them into fun shapes.  I'm sure you could even use those colored marshmallows for a cool little twist.  

Well that's all I've got in me for now :)  I am off to enjoy one last night in my loves arms, I hope y'all are enjoying your weekend with what ever makes you happy!  Until next time....


Stay sweet,


Jennifer xoxoxo

Sunday, September 29, 2013

Fall Hauls!

Hello Sweets,

The weekend is over :( for y'all anyways lol!  You know me being off work and such makes everyday a weekend, which gets old real fast.  It seems like a lovely idea to lead the life of a cat ;) but in reality it gets boring quick, unless you're a cat then it's okay lol.  Today was a very productive day for me :)  I started my day off right by going to church, it was nice to see my pastor again although he asked where I had been :/ (I know bad girl)  It was okay though, they are well aware of my health issues and were just happy to see me again :)  Then Heather and I finally caught up!!  I told you I felt good about today lol, we completely lost track of time and were chatting for 2 1/2 hours.  We did a fun little trade, I gave her baked goods and she gave me board games win win!!

When I finally did make it home I realized, "hey what about the muffins I was going to make?".  So I looked at a couple different recipes and decided I was going to make my own.  I did that because I couldn't find something close enough to what I wanted, later this week I may make my spicy pear muffins because they are super yummy!  Now that it's getting chilly outside I am all about warm spices and fall hauls :)  Anyone who lives/lived in Ontario knows what September brings, an abundance of apples and pears!!  Two of my very favorite fruits, especially to bake with ;)

Spicy Apple and Pear Muffins
Ingredients
1/2C apple, diced
1/2C pear, diced
1/3C applesauce
3/4C milk (if you use skim it make the recipe fat free!)
1/2tsp salt
1 1/2tsp baking powder
1/3C sugar
1 3/4C all-purpose flour
1/4tsp ground ginger
1/2tsp cinnamon
1/2tsp allspice
(I pre-seasoned the fruit a little before with extra)
 

Directions:
1)  Preheat oven to 375F, greasing a muffin tin.  Mix together in a large bowl; sugar, cinnamon, ginger, and allspice.
 

2)  Add the flour, baking powder, salt, milk, and applesauce to the sugar mixture.  Do not over beat.
 

3)  Stir in the diced apples and pears.
 

4)  Spoon batter into the greased muffin cups.  Bake for 20 minutes, or until tops spring back when lightly pressed.
 

5)  Serve after muffins have cooled a bit, about 20 minutes.


(I did a double batch, that's why there's so many)

Right now my whole house smells like delicious fall baking, the smell is very close to apple pie :)  These muffins are smaller and dense, but you definitely only need one to curb your hunger.  I like the combination of the apples and pears together, they mesh really well and each bring there own dynamic to the muffin.  The apple is a little more tart so the pear gives it a little sweetness, I personally prefer fruit muffins because I like the moistness they give.

I know this post is a little short but my shoulder is all of a sudden screaming at me :(  Guess that's all I can give y'all tonight, but hey something is better than nothing right?  Until next time....


Stay sweet,


Jennifer xoxoxoxo


Saturday, September 28, 2013

Sweet Fluffy Clouds

Hello Sweets,


I hope y'all are having a lovely weekend :)  I started today off with a migraine, not a good thing lol, which obviously threw my whole day out of whack again.  Luckily the person I was supposed to meet up with is very understanding so we will try again tomorrow, but I've got a good feeling about it :)  We've been trying to connect for literally a week now lol, it's so hilarious to us.  So I've just been lounging around thinking and doing my crossword, and now I feel much better :)  I spent a few hours with my sister and nephew yesterday and I enjoyed it very much, but my shoulders are sore today so it was mostly resting and only a little creating today ;)

I've got a lot on my mind right now so focus is a little hard for me, but baking and creating in the kitchen always grabs my attention.  Since I have an upcoming party to get ready for I am in full planning mode, half the planning was done based on reputation (Pumpkin cupcakes sell themselves).  My main focus is on the birthday boy's cupcakes, he is going to be 8 and is a HUGE Star Wars fan so that is the theme!  Specifically he is a fan of Darth Vader and Darth Maul, yes he is a fan of the dark side lol.  So I am looking at  a couple different options for the decorations, and if I want to create a little character or symbol that is more crisp than just piping icing there are only a few different options.  I tried one of them today, it was my first time ever working with this type of product and making it myself.  I am proud and excited to announce that it was a success!

Marshmallow Fondant
Ingredients
marshmallows, small or big doesn't matter
icing sugar
water
food coloring, optional
flavoring oil, optional
  

Directions:
1)  Take a couple of handfuls of marshmallows and place them in a microwavable bowl.  Add a couple drops of water and toss until they're damp.  *if making more than one color use the whole bag*
 

2)  If using flavor oil, add in now and use less water.  Place the marshmallows in the microwave for 10 seconds at a time until they're puffed up and easily stir into goo with a wooden spoon.  *I sprayed my spoon with cooking spray to help the marshmallows from sticking*


3)  Add the food coloring to the melted marshmallows until you get the color you want.  Remember you're going to be adding icing sugar which will lighten the color, so make sure it's a bit brighter than needed. *I opted out for this batch as it was a test, and I may also need white ;)*

4)  Start folding icing sugar into the marshmallows until it becomes a soft and fluffy dough *I added heaping spoonfuls at a time*.  Dust hands and counter top with icing sugar, turn mixture out on the counter and sprinkle with icing sugar.
 

5)  Continue to kneed until stiff enough to roll out.  Dust rolling pin with icing sugar and roll the dough until you reach your desired thickness.  Cut is a sharp knife into desired shapes.


Sorry but I can't show you what shape I created today as it is a surprise, but any Star Wars fanatic will probably know based on the scored markings ;)  This is very sticky to work with until you reach the perfect consistency and then it is just like regular dough.  It's very tasty, like a sweet dense marshmallow and I look forward to seeing the kids at the party devour them :)

I'm thinking tomorrow about making something less on the dessert side, maybe muffins??  I bought some lovely apples and pears which has been filling my head with all sorts of ideas, I might even whip up a batch of my spicy pear muffins as they're oh so good!  Oh before I forget :p, yesterday I told you that I bought some new bakers treats and I would share them with y'all today, and I am true to my word;


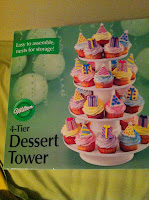
isn't it pretty :)

I got it for half price (score!!), and it's compact and durable which will help with taking it to and from clients locations.  The shelves are also slightly tilted outward so displaying beautiful treats is even easier, eek I can't wait to use it!!  I know I'm a baking nerd who loves kitchen stuff, but I love getting new gear to make my passion even more of a breeze.  Until next time..........


Stay sweet,


Jennifer xoxoxoxo


Saturday, August 31, 2013

23 Flavors of Deliciousness

Hello Sweets,

So its been a few days since I've posted anything, and even longer since I posted something with substance to it :/  Do you know that I actually get more down the more time between my creations, well it's true :(  My health doesn't allow me to do much of anything, so when I don't do what is within my means I get purdy down.  Needless to say if I'm posting now I obviously have had a break in my insanity, but oddly enough I still feel fairly blah-zay.  This frustrates me, and I'm not sure why I can't shake this damn funk >_<  Either way, here I am with a tasty treat to share with y'all :)  I will try and keep this post upbeat and fun, but I'm struggling with this right now.

I know many people are going to read this post and see the soda and will say it's full of sugars and processed blah blah blah.  I agree that soda is not the healthy choice, but I also subscribe to the everything in moderation philosophy.  But Dr. Pepper boasts a soda with 23 flavors, and while in Texas we prefer to get the real sugar version (btw soooooo much better).  Naturally as a Texan, Nathan LOVES Dr.Pepper, especially the cherry version.  So when I came across a version of cherry Dr.Pepper cupcakes, I couldn't pass up the chance.

Cherry Dr.Pepper Cupcakes
Ingredients
1/2C butter, softened
3 large eggs
1/2C milk
2 1/2Tsp baking soda
2 1/2C flour
2 1/2C brown sugar
3 oz unsweetened bakers chocolate, melted
1/2Tbs lemon juice
1/2Tsp salt
2Tsp vanilla
1C Cherry Dr.Pepper, cooled
 

Directions:
1)  Preheat oven 375F.  In a small saucepan bring the Dr. Pepper to boil.  Set aside so it can cool before you add it to the batter.
 

2)  In a small bowl add the lemon juice (yes I squeezed it lol) to the milk and let sit.  You can use buttermilk in replace of the lemon juice/milk concoction.  After allowing it to sit for 5 or so minutes, add the baking soda to it.
 
3)  Cream together the butter and sugar, mixing until light and fluffy (not your typical light and fluffy because the butter to sugar ratio is very unbalanced).
 

4)  Add the melted chocolate, thats been slightly cooled.  Then beat the eggs in thoroughly.
 

5)  Mix the remaining dry ingredients in another bowl.  Alternately add the dry ingredients and the milk mixture to the chocolatey sugar mix.


6)  Mix in the vanilla and lastly the cooled cherry Dr. Pepper.
 

7)  Pour into cupcake liners, bake for 20-22 minutes, or until a toothpick inserted into the center comes out clean.


Of course these bad boys aren't finished, there is a deliciously and light frosting to finish them off, but as per my torturous ways, that will be tomorrows post!  Again, like with the cola cupcakes, they're light and airy and not overly sweet.  They're not over-powered with the taste of cherry Dr. Pepper, but it has a lovely under tone of cherry.  As you know I'm a cherry junkie, so needless to say you can let your imagination run wild with how these bad boys will be finished.

So I think I managed to keep this post fairly upbeat, but frankly I am still feeling blahhhhhhhhhhh lol true story.  Hopefully tomorrow I will be in much better state of mind and can delivery something fun, exciting, and ENERGETIC!!!!  Okay maybe that was a little forced, but I'm trying lol.  Until next time..............................................................


Stay sweet,


Jennifer xoxoxoxo