Showing posts with label celebrate. Show all posts

Friday, January 24, 2014

No Toast Required

Hello Sweets,


Happy Friday y'all!!  I hope you have some quality kitchen time scheduled for this weekend, I think I'm going to take a break from packing and do some creating myself.  I woke up today so unbelievably stiff this morning thanks to my tumble down the stairs yesterday, which has made doing anything difficult.  However, nothing was going to keep me from giving y'all something juicy to read ;)  And no I'm not taking about the latest gossip, but I am talking about berries.

Keeping with my Thanksgiving throw back, I have the final recipe that I used back in November!  This particular Thanksgiving accompaniment is something I'm not a huge fan of, but that being said the homemade version I whipped up tasted pretty good on it's own lol.  I have to try everything I make in order to adequately write a good post, well that and I ask the person I make it for.  Today's post contains cranberries, so you can only guess what I used them for.  If you guessed cranberry jelly then you'd be correct!  Nathans dad loves it with his turkey, so I asked him if I could make it for him.  He agreed on the condition that I didn't vary too far from the flavor his lovely canned stuff tasted like >_<  Of course I took that as I could make it flavorful but don't add too much extra spice to it, lets be honest most pre packaged stuff doesn't have much flavor period.  Since I haven't eaten too much cranberry jelly in my life (okay, any lol), I had to do some research to see what types of spices others had used.  Thankfully I had a general understanding on how to make the jelly itself from when I made my pie fillings, it's a little different but not overly.

Cranberry Jelly
Ingredients
2 1/4C cranberries
1 1/2C sugar
2/3C apple cider
1/2 lemon, juice only
dash of cinnamon
cinnamon was a last minute addition

Directions:
1)  Place everything, except cinnamon, in a medium sauce pan.
 

2)  Over medium-high heat, cook until cranberries burst.
 

3)  Stir regularly, adding a splash of water if the mixture becomes too thick.
 

4)  Once finished, place in a sieve and push with a rubber spatula.  Continuing until only seeds and skins are left.  Add the cinnamon, stirring to incorporate fully.  Chill at least 12 hours to set.
completely solidified, even has markings from the Ziploc container
  

Nathans dad really liked it, he said it tasted better than the canned stuff.  He even like the subtle cinnamon flavor I added, and now I hope he'll let me do it every year :)  This, just like the pumpkin pie, was something I had never tried before.  I don't think it's beginners luck, but I do think because I am becoming more confident in my kitchen skills it is transferring over to my creations.  Not much makes me smile more than being able to make something for those I care most about :)

Since this is a shorter post I wanted to share some updated photos of my new place, now that everything is installed.


I  am so excited, it's so close that I can barely contain my excitement!!!  I know it's been official for a while, but now that everything is installed and working it actually feels real :D  I get my key on Tuesday and then I start the move, so if you don't hear from me daily y'all will know why.  I am going to do my best to post, but if I haven't done any baking or cooking you may just get a quick little blurb :)  Until next time...


Stay sweet,


Jennifer xoxoxo


Saturday, October 12, 2013

Darth Birthday

Hello Sweets,

Today was the big day, the big unveiling of my first paying job :)  Since I didn't have a very long post yesterday I was hoping to get a decent one out tonight, but we will see how my pain tolerance goes.  I had to whip up a dessert for our Thanksgiving dinner tomorrow (yes, us Canadians do it in October), and now my feet are killing me :/  But I'm going to do my best to push through to bring you some fun decorations!

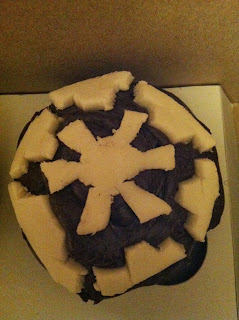
So I've been building up to this post all week, cupcakes were baked for little Jacob's birthday all that was left to do was to decorate them.  Nathan is my go to guy for anything Star Wars so I had him help with the brainstorming process, and he was indeed helpful :)  Since the cupcakes for the kids were going to be decadent chocolate I decided to make the icing with a dark cocoa to get it as close to black as possible.  If you have ever had cake with black icing you'd know why I wasn't making it black to begin with, it turns your whole mouth black and that just doesn't look good on anyone lol.  That of course was the easy part, that hard part was the decor and I of course put lots of pressure on myself lol.  I chose to use the marshmallow fondant in three colors and silver balls for accents.  I looked at all sorts of different pictures from the Star Wars series for inspiration and continued with the Darth theme, specifically Vader and Maul :)  Of course there had to be light sabers, but the rest was left up to mine and Nathans imagination.  Take a look at the fun cupcakes made for the special birthday boy, and a fun pictures of my nephew Miguel :p

 
started with a delicious deep chocolate icing
 
I used a smooth, slanted icing tip
 
First cupcake design was the imperial logo
 
 Light sabers, dark vs. light
 
 Vader's respirator box
 
 another Imperial logo, not as pretty as the first one
 
 A dark side light saber for Jacob
 
 outline of Darth Vader
 
 Darth surrounded by stars
 
 Darth Maul's "tattoos"
 
 Star Wars, 8th addition for Jacob
 
 big birthday boy turns 8!!
 
 Star Wars :)
 
 dark vs. light
 
 New sticker labels!!
 
 2 dozen delicious treats!
 
Miguel and his "top hat"
 
 party time!!


you know cupcakes are good when they're all over his face!

I am also happy to report that Christina (Jacob's mother) just emailed me to let me know that everyone enjoyed them, and there wasn't a single one left lol.  That is the best thing I could hear from one of my customers, and I look forward to many more!

Tomorrow is going to be a day full of family and food so it will be a post of deliciousness, also known as "I will be so full there won't be much energy left to think" lol.  Until next time....


Stay sweet,


Jennifer xoxoxoxo

Sunday, August 4, 2013

Poppin' Bottles

Hello Sweets,

I hope everyone has had a relaxing Sunday, and for most of my Canadian readers enjoy one more day off (it's a holiday tomorrow).  I've done nothing but relax all day because I've felt super awful :(  Sleep is becoming somewhat of an illusion to me, I have trouble sleeping as it is but now I'm having nightmares too.  Sigh, what are you going to do right?  Well I'm going to blog because it tends to take my mind off of everything, and y'all are pretty awesome :)

Yesterday I told you that I'd be sharing an "adult" treat I made for the fourth of July, and judging by the title of this post do you have an guesses?  Yes it does include champagne, but it also includes something children love.  It wiggles, it jiggles, it's Jell-O (I sang that as I wrote it and I hope you sang it too lol).  Yup I made champagne Jell-O shots, and of course I stuck with the theme of red, white, and blue.  Now I'm not going to give you the recipe for any of the flavored Jell-O, because all you do is sub the champagne in replace of the cold water.  However, unflavored gelatin is a completely different process so that is what I'll be sharing today.  This recipe is NOT mine, I found it on another blog called Dixie Delights.  I haven't read all of her stuff but what I have read I love, she seems like a fun and down to earth person.  She's from Georgia so you know she's a real southern bell, so please check out her site too I know you won't be disappointed.

Champagne Jell-O Shots (from Dixie Delights)
Ingredients
1 box of unflavored gelatin (4 pks)
1 bottle of your favorite champagne
cups to set the jell-o in (we picked up condiment cups at Wal-mart)

Directions:
1)  Pour 2 cups of champagne into a saucepan, and sprinkle with gelatin.  Allow a few minutes to let the gelatin settle into the liquid.

2)  Heat on low, stirring constantly until the gelatin has dissolved.  This will take approximately five minutes, once the bubbles subside you will be able to see if it is completely dissolved.  Remove from heat.

3)  Stir in the remaining champagne and pour into your cups.  Place in the fridge and allow to set, as she did I also left mine overnight.


When you mix it with the fruit Jell-O it's a subtle flavor, but with the unflavored gelatin it's all champagne baby :)  It also has a carbonation to them which make them even more enjoyable, as if that was even possible right?

Well I said it would be a short, sweet, and sassy post and I think I've delivered ;)  Tomorrow we're going to take an imaginary trip over to a country that has wooden shoes and nesting dolls.  We are going to make one of the dishes they are best known for, but you'll have to come back tomorrow to find out what it is!  Until next time......................................


Stay sweet,


Jennifer xoxoxoxo


Sunday, July 28, 2013

A Medley of Marriage

Hello Sweets,

Well the weekend is coming to an end, and unfortunately I am feeling extremely awful :(  An intense migraine coupled with being nauseated and shoulder/neck pain, is causing me to be an unhappy camper.  I think  I did too much on my own yesterday, normally I have some assistance to help me with things around the house but I was home alone (cue the "AHHHH" lol).  Even though I managed to get through what I needed to do, my conscience was telling me I'd most likely regret it in the morning and here I am.  But since I haven't done too much today I figured I would try and get y'all the last wedding cookie recipe :)

So far we've had a banana cookie, a peanut butter cookie, and a chocolate chip cookie.  The last cookie was going to be in the shape of their newly shared last name initial "Z", so I wanted to "marry" the first three flavors together as to depict the vows of my sister and (now) brother in-law.  I know, I'm a complete romantic but I just thought it would be a really unique, fun, and different way to do a wedding cookie.  A single cookie that represents; my sister, my brother in-law, and my amazing nephew and their new endeavor as a married family.  My sister originally wanted me to do just a regular (possibly sugar) cookie, but when she heard my idea she liked it very much :)  So I present to you the "Zamora"!

Peanut Butter Banana Chocolate Chip Cookies
Ingredients
1/2C + 1Tbs butter, softened
1/2Tsp cinnamon
1/4Tsp nutmeg
1/4Tsp cardamom
2/3C super fine sugar
1 large egg, lightly beaten
2Tbs milk
1 ripe banana, mashed
1/2C milk chocolate chips
1 1/4C self rising flour
1/3C peanut butter

Directions:
1)  Preheat oven to 375F, lining two baking sheets with parchment paper.  Place the butter and sugar in a large bowl and beat together until light and fluffy.

2)  Gradually add in the egg, beating well after each addition.
 

3)  Mash the banana and add it to the mixture, beating well until smooth.
 

4)  Add the peanut butter and mix thoroughly.
 

5)  Sift together the flour and spices into the mixture, folding in with a spatula.  Add the milk to give it a soft consistency, then fold in the chocolate chips.


6)  Drop tablespoons of the batter onto the baking sheets, spacing well apart.  Bake for 15-20 minutes, or until lightly golden brown.  Cool slightly on the baking sheets, then transfer to wire rack.

 There you have it, the final cookie in what I am now dubbing "the wedding series".  This cookie is soft and not too sweet, it was a big hit.  Even though all the cookies weren't finished at the wedding, I packed them up and sent the married couple home with them.  Needless to say I got an email about a week later stating all the cookies were gone lol.  And now as promised I'll share some of the wedding photos with you :)
 
on our way!
 
my cutie nephew playing the shy guy
 
the kiss
Nathan, myself, Jose (groom), Asha (sister/bride), my mother Trish, and my step-dad Dan 
  
yea we're pretty awesome (except for my paleness :( )

 
celebrating and a special moment between mother and son <3  
 
"THE" cookies, in all their glory :)
 
tiny little table (so cute) for the kids
 
the candy bar, yum!
 
family dance :)
 
yup it's true I caught the bouquet and a special moment between my love and I during our dance
 
Finally caught him for a picture at the very end of the night

I hope you enjoyed the four recipes, if you have any questions or feedback regarding them just drop me a line :)  I also hope you enjoyed the pictures of my sisters special day that I've shared with you.  It was a day full of love, laughter, celebrations, and most importantly family.  It's a day that will forever hold a place in my heart and there were plenty of memories that were made.

Now that the matrimonial posts are all done and finish, we can get back to just creating more delicious treats in the kitchen to share with you :)  With that being said, tomorrows post will be another celebration for a very good friend of ours.  Yes it will be a birthday themed post, only because I was requested to bake his cake for him (apparently my reputation is spreading).  Until next time...................


Stay sweet,


Jennifer xoxoxo