Showing posts with label original. Show all posts

Wednesday, September 25, 2013

The Nutty Candy Man

Hello Sweets,

How are all my lovely readers today?  I am in a fantastic mood :), which is weird because I woke up with a migraine and that normally makes me grumpy all day.  I was lucky enough to spend a few hours with my nephew Miguel, and he is just the best little boy around.  I know I'm biased, but he's just so funny and inquisitive right now.  Today I showed him a video of Nathan and I flying around the Dallas area, he was in complete awe.  He couldn't believe what he was seeing, and at one point he thought we were in a helicopter because he saw the propeller.  Once I explained to him what the propeller was for he had this adorable little smile on his face :D  I asked him if he would want to go flying in the airplane when he comes visit Texas, and he excitedly said YES!  I know this will make Nathan very happy, as he wants to get to know him better (seeing as he'll be his uncle one day) but that's hard when we live in two different countries.  In the meantime Nathan is going to bring back an American Airlines plane on his next visit for him to start building their relationship, these two are the cutest!

So today's post is a short one, mostly because the recipe is short but also because the website is almost ready to go live and I'm hoping to finish that up tonight so I can share it with y'all tomorrow.  Okay maybe there is one more tiny reason, Criminal Minds starts back up tonight and my roomie and I watch it together lol (I know, silly).  Today's post is the first in a three part series, these recipes were part of my "first delivery" which was for a party my mom was threw.  It was actually her husbands birthday, so I decided to make a cupcake geared towards his favorite things.  This sweet little treat was the finishing touch, and lets just say "someone" may have eaten one without eating the cupcake just so they could have one lol ;)

Canuckette's Candied Pecans
Ingredients
1/3C sugar
1/3C brown sugar
1tsp cinnamon, heaping
1 egg white
1Tbs water
1 2/3C pecans
splash of vanilla
tiny pinch of salt
 
(vanilla not show as it was a last minute addition)

Directions:
1)  Preheat oven to 250F.  Mix sugars, cinnamon, and salt together in a small bowl, set aside.
 

2)  Whisk egg white, vanilla, and water together in a separate bowl until frothy.  Toss pecans in egg wash.
 

3)  Mix pecans in the sugar mix until they are evenly coated.  Spread onto a baking sheet.  Bake for 1 hour, stirring every 15 minutes until pecans are evenly brown.
 

4)  Allow to cool on parchment paper and enjoy!


Don't they look yummy :)

They are the perfect blend of salty and sweet, not to mention it's the best nut around!  Obviously I ended up with leftovers, but I'm sure I can figure out something to do with them ;) lol.  These are so much better than the pre made ones you can get at a local baking supply store, but the pan needs to be cleaned right away as it is a sticky mess.  Also, I wouldn't use a good baking sheet because you will need to scrub it clean.  

So like I said earlier, I am hoping to roll out the website either tonight or tomorrow.  As soon as I do I'll share it with y'all, and just like my blog I always love hearing feedback :)  But right now I'm going to go make some more of my now famous Pumpkin Spice Cupcakes, because I don't want the pumpkin puree I already have open to spoil.  And maybe because I didn't keep many for myself from the last batch lol, and damn they're good.  Until next time............


Stay sweet,


Jennifer xoxoxo

Wednesday, March 6, 2013

Lookin' Like A Certified Texan

Hello Sweets,

Well the week has begun. Have you been productive so far?  I've been sort of productive lol, I've had some bad migraines so I have been doing small projects and no writing :(  But I was feeling the itch to do a post so I'm giving it the old college try :)  I must say that I am very much enjoying being beside Nathan again.  Until you're in a long distant relationship you never appreciate the little things like holding hands or cuddling.  So if my posts are a little sporadic I apologize, but it probably means I'm enjoying my time with my soul mate ;)

So as I mentioned previously I tried something completely new in regards to my kitchen adventures.  I was actually intrigued because of an article I had read (again I don't remember where from lol).  Now I looked at tons of different recipes to determine what spices I wanted to include, but ended up using my favorite tool; my nose :) to really determine what needed to be added.  So are you sitting there wondering what I decided to try?  Well I said it is part of both the most important and delicious meal of the day, which means breakfast, and there are only specific things we can make.  I decided to tackle something that not everyone loves, but those who do have probably had a bunch of different ways, good ol' sausage!  That's right, Canuckette tackled breakfast sausage all on her own and succeeded!  Since I was creating these delicious patties I finally got to use another of my many kitchen gadgets that I was given at Christmas time.  Check out my Westin Patty Press, it made my sausage patties look very professional not to mention I can control the thickness of the patties.
 
pretty cool huh?

Now I'm going to share with you what I've created and will also give you other spices you can add depending on what flavor you are looking to create.

Texan Breakfast Sausage
Ingredients
2lbs ground pork
2Tsp marjoram
1 1/2Tbs sage
2Tsp red pepper flakes
2Tsp thyme
1/2tsp cayenne pepper
1/2Tsp salt
1/2Tsp black pepper
1/2Tsp cloves
1/2Tsp garlic powder
5Tbs maple syrup

Directions:
1)  Mix all ingredients in a bowl, put in the spices in small amounts so you can balance the flavors.  When you think you've reached your desired flavor, do at test patty so you know whether or not to adjusts the spices.
 

2)  Form into patties and fry for six minutes on each side, careful not to under cook for the obvious reasons or overcook as it will make them dry.  They can keep in the refrigerator for up to one week, or you can freeze them for later use :)
I paired them with my homemade biscuits and some home fries

Here are some of the other spices you can use in your breakfast sausage such as; nutmeg, rosemary, basil, fennel seed, ginger, cinnamon, allspice, mustard, cardamon, or caraway.

I encourage you to really use your sense when creating your sausage because even with just a sense of smell you can get a very good idea of what the flavor will be.  I hope you all have as much fun creating this sausage (although I could go without touching the ground pork) as I did, and that you get that flavor you're looking for.  Until next time...................................................


Stay sweet,


Jennifer xoxoxo

Saturday, January 19, 2013

Come Together Right Now, Over Food!

Hello Sweets,

I hope everyone is enjoying their weekend.  Are you staying in, or do you have all sorts of plans?  What have I been doing?  Well today was a write off (so glad I finished my creation last night), so I've been sleeping or resting, so that means I've done nothing lol but hey if that's what my body needs, I'm not going to argue.  Hopefully tomorrow I can get out to visit my grandparents and then I am hoping to make a chili from scratch (or close to it) for the first time, so wish me luck.  With the way the weather is here in the winter, warm comfort food is absolutely amazing!

Well tonight is the night that I finally reveal my original one of a kind creation :)  Did you guess what it could be?  So far the only clues I've given you is that there is candied bacon and a maple butter icing, so I think you've probably already got a pretty good idea what it could be.  If you guessed a "Canadian" inspired cupcake you would be dead on!  Now I will give fair warning that this cake recipe came out a little drier than I would have liked and it is dense (which could be part of it), but I think if I had pulled it out a couple minutes before it was completely set or used the cream that was called for (I used a kitchen trick with regular and butter), things may have worked out differently.  But that is all part of the process, now I know when I make this recipe again to try changing the measurements or ingredients to achieve what I am looking for :)  Let's get to the final part of the mini series!

Vanilla Cinnamon Cake
Ingredients
1C plus 2Tbs butter, softened
1 2/3C sugar
4 large eggs, room temperature
1Tsp vanilla
3C all-purpose flour
2 1/2Tsp baking powder
pinch of salt
2Tsp cinnamon
1 Tsp allspice
1C half and half cream

Directions:
1)  Preheat oven to 375F.  Line 24 muffin cups with cupcake papers (or you can make it into a cake as well).

2)  In a mixing bowl with an electric mixer, combine the butter and sugar.  Beat until light and fluffy, scraping the sides of the bowl to combine everything.

3)  Beat in the eggs and vanilla until smooth and well blended.

4)  In another bowl combine the flour, baking powder, salt, cinnamon, and allspice. 

5)  Stir the dry ingredients into the creamed mixture with the cream until blended.  Beat for 2 minutes.

6)  Fill the cupcake papers about 2/3 full.  Bake for 18 minutes, or until a toothpick inserted comes out clean (although I would pull out slightly sooner).  Cool in the pan for about 2 minutes, then remove and cool completely on a wire rack.

So there is the third and final recipe :)  I then decorated the cupcakes with the icing and candied bacon, and low and behold we have a Canuckette Canadian cupcake!

The flavors are a fantastic blend of salty and sweet up top, then the cupcake base is a play on french toast with the vanilla, cinnamon, and allspice.  

I can say that I am very proud of myself for taking my passion and not just tweaking someones recipe but taking an idea from my big ol' brain and creating it in the kitchen :)  I am definitely going to try and do this more often, because it gives me a great feeling of creativity and I take pride in everything I make, but knowing it's my very own is even better.

I encourage all of my readers, whether your passion is in the kitchen or somewhere else to push yourselves to do something original.  Of course there will be times where we don't succeed the exact way we intend, but as I always say it's a learning curve and you can only learn from the mistakes that are made.  Let me know what you think of my original recipe, and if you try let me know if you like it too!  Until next time.............


Stay sweet,


Jennifer xoxoxo

Love Straight From Natures Heart

Hello Sweets,

I am sorry I didn't get this post to you yesterday, but I had a pretty bad migraine that had me laid up all day :(  But I really wanted to get this creation out of my head and into the oven so I went to bed early last night in hopes of gaining some headway, now I'm not one hundred percent, but I'm able to do part two of the three part creation (and was smart enough to do part three tonight too!).

So when you think of all the gifts we get from nature what do you see?  If you're from Texas maybe you see beef, if you're from Mexico maybe you think of guacamole, but if you're from Canada every child goes to the sugar bush for fresh maple syrup!  So that is precisely the star ingredient in today's post :)  Maple syrup is delicious in a variety of ways but there is one thing that I have never had, and that is maple infused icing, which made me determined to try and create my own.  This is a very simple recipe as it is a butter icing but depending on your sweet tooth you can play around with the measurements.

Maple Butter Icing
Ingredients
3/4C butter, room temperature
4Tbs icing sugar
3Tbs maple syrup or table syrup
 

Directions:
1)  Combine all ingredients in a medium bowl (I started with a couple of tablespoons of the icing sugar to slowly work to the right taste), and with an electric mixer blend until smooth and creamy.

2)  If needed continue to add icing sugar spoonful at a time.  If not using right away store in the refrigerator (remove 1-2 hours before icing cakes).

 There you have it, a simply sweet icing that can be used on a variety of cakes, muffins, or sweet style breads.  Or you can use it the way I did, but you'll have to come back tomorrow for me to tell you that ;).

I know this is a short but sweet post (see what I did there lol), but my shoulders and neck are really sore :(  so I think it's best to call it a night.  Make sure you come back tomorrow for the conclusion of Canuckette's original creation (is it weird that in my head it sounded like the old school batman announcer lol)  Until next time...........


Stay sweet,


Jennifer xoxoxo
 

Wednesday, January 9, 2013

Spice Spice Baby

Hello Sweets,

I hope everyone is having a wonderful weekend. I have been laying pretty low since I have been feeling "off", but decided that I needed to try and take my mind off of that by getting back into the kitchen tonight!  We met up with our friend Dave tonight to exchange our Christmas gifts, and boy do people really know what I like!  Take a gander at my lovely gifts, can you tell I have a real passion now lol?

Thanks Dave!! Apparently this wine book will make me a bit of a wine snob lol

One other little gift Dave gave to me was my finalized logo cartoon!!  Check it out, then head over to his website.  He is in the middle of overhauling his blog so be prepared for the format to change in the coming months :)  It will soon be an art based blog, and trust me when I say he has the skills as you can see below.
Isn't she lovely :)

So as I had told you all in my last recipe post, while making the spicy green sauce for the enchilada's my kitchen creation wheels started turning with ideas for a new extra spicy salsa.  Being in Texas with Nathan and his family has shown me that if you say you're going to make something spicy you better be sure it delivers, so I didn't skimp on the heat but I am only posting this recipe as a guideline because not everyone likes it hot like we do lol!

Canuckette's Extra Spicy Salsa
Ingredients
(remember this is just a guideline, use your discretion)
20-30 tomatillos 
15-20 serrano peppers
5 habenaro peppers
1/2 white onion
1 lemon, zested and juiced
garlic, chopped
black pepper
garlic powder
sea salt
seasoning salt
 
 Directions:
1)  Remove the husks from the tomatillos and the stems from the peppers, and wash them.
 

2)  Place them all in a pot and boil until the tomatillos are lighter in color and soft.

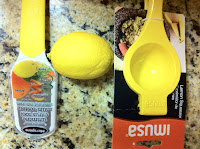
3)  While that is boiling zest and juice your lemon, then mix with the chopped onion.  Plus check out a couple more of my fun kitchen gadget gifts :)
 
  
super easy with all the fun tools :) (not shown is my kitchen aid chopper)

4)  Drain the water from the pot and then transfer everything into a blender, adding seasoning to your preferences.  Blend until desired consistency is reached and enjoy!
 

There you have it a super easy and affordable homemade salsa, plus you'll have a good amount perfect for a party or get together!

Well folks I only have a couple more days left with Nathan before I go home so you can bet I'll be baking something new and delicious :)  Plus he made some amazing and yummy shrimp for dinner so I'll be blogging about that tomorrow.  Until next time.............


Stay sweet,


Jennifer xoxoxo